
The Ultimate Guide to Start Earning on Apify
A step-by-step tutorial to start your web scraping journey on Apify and make a steady passive income.


It all started with two individuals from Prague, Czech Republic, who had the bold idea of creating a portal between website data and people.
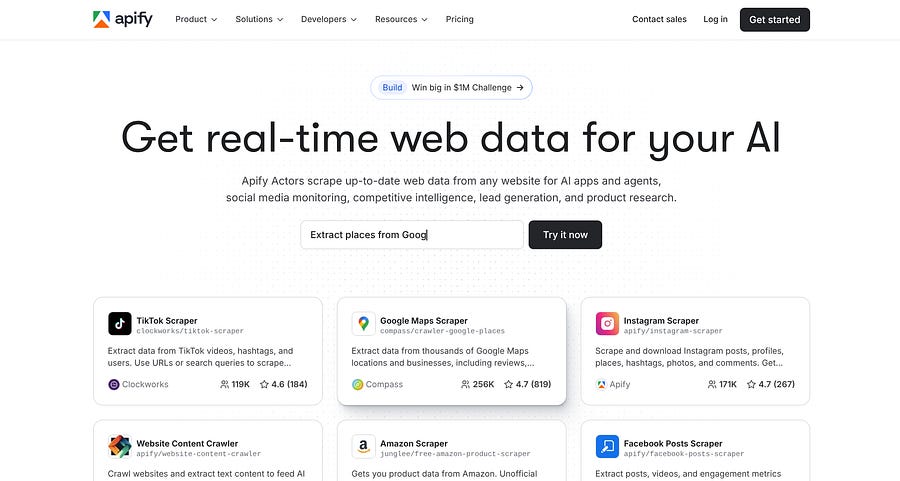
Apify is a platform where you can be paid for submitting your web scrapers, agents, and automation scripts. All you need is some Python or JavaScript knowledge and to follow this tutorial.
There are more than 25k customers on the platform, and more will be joining to have instant access to data from thousands of websites.
According to a report by Mordor Intelligence, the web scraping market is expected to grow 14.20% CAGR (Compound Annual Growth Rate) between 2025 and 2030, from 1.03 billion to 2 billion dollars.
The demand is there. With AI and several automation tools like N8N, more people are looking for APIs and easy access to data, eliminating the need to hire developers to build custom web crawlers.
Building actors on Apify is an opportunity for developers to take advantage of the huge wave of vibe-coders and builders who want to connect crawlers, agents, MCPs, and more to their SaaS products.
In this step-by-step guide, I’ll show you how to get started on Apify. By the end, you’ll be ready to build your first actor and start generating a steady passive income.
Hands-on with the Apify console
You can create an account on Apify for free using your Google account, GitHub, or another email provider.
With the free plan, you get up to $5/month to use for running scripts on the platform, which is basically the cost associated with the remote machines the platform provides.
But don’t worry, you won’t need to spend too many credits if your crawler is working fine in your machine. You’ll only use the credits to test it on the platform. So $5.00/month is usually more than enough to start.
If at some point, you start to scale and need more credits, there is the Creator plan, which is very cheap ($1/month), and you get around $85 per month. I use that plan and rarely surpass $10 monthly.

Once you’ve created an account, you’ll have access to a console that can look overwhelming for beginners.
For developers, the main pages are:
My Actors
Insights
Proxy
Settings
You may use the remaining pages/tabs, but I don’t find them as essential as the ones above from a developer perspective.
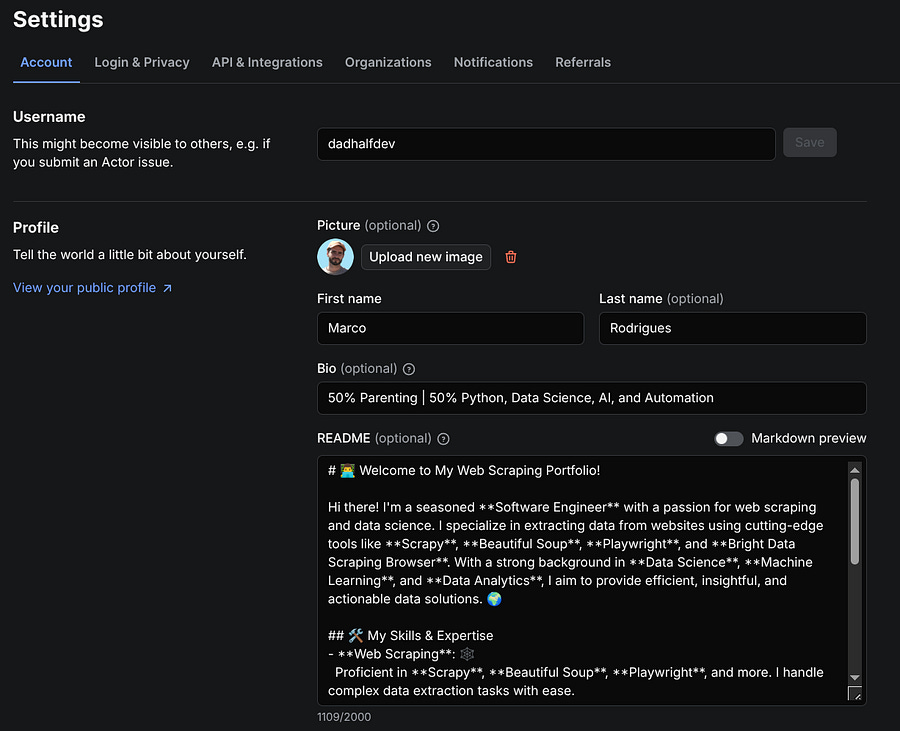
Provide information about yourself in the Settings page
In fact, the first thing you should do is go to Settings and add some information about yourself. This helps customers who try your actors get to know you better, increasing the chances they’ll keep using your crawlers, or even reach out to you for custom ones.
Yes, Apify can also serve as a platform to sell your services externally, so be sure to write a clear and concise README file.
Understand the different actor states
The second most important is the My Actors page. Here you can see all your current scrapers. Including active, under maintenance, or deprecated. At this point, you probably don’t know the difference between these three, so let me take a few minutes to explain.
The active ones are the actors that are up and running without issues. The under maintenance actors are the ones that were flagged by the platform with some issues to be resolved. The most common error is when your actor exceeds the 5 min limit, but it could be related to something else, and you would see a notification like this:
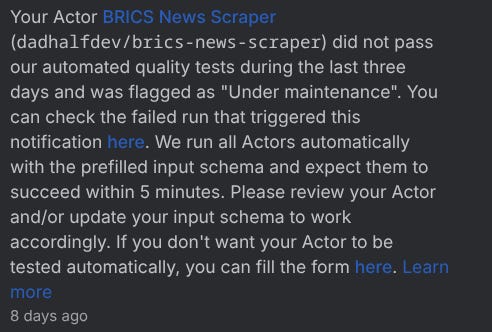
If you click here on the notification, it takes you to the log where the issue was triggered. If your actor is not fixed within 14 days, it switches to a deprecated state, and it will no longer be visible on the platform for customers. You can also set yourself the under maintenance or deprecated states.
⚠️ Important Note: If your actor was under maintenance or deprecated and you’ve made the changes and pushed, it won’t be automatically fixed. You need to go to the Display information option under Publication and unset your actor’s current state.
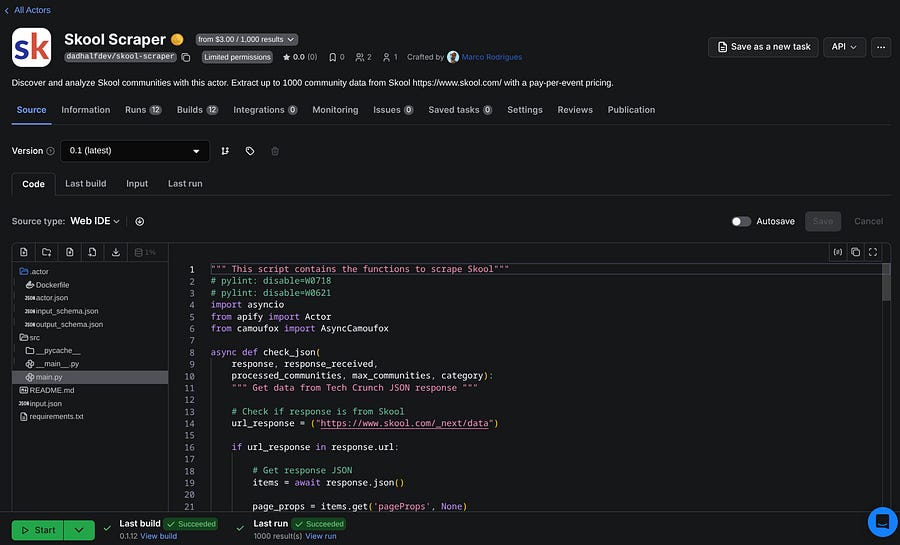
To make these and other changes to a specific actor, you can click on them under My Actors, and you’ll see several tabs.
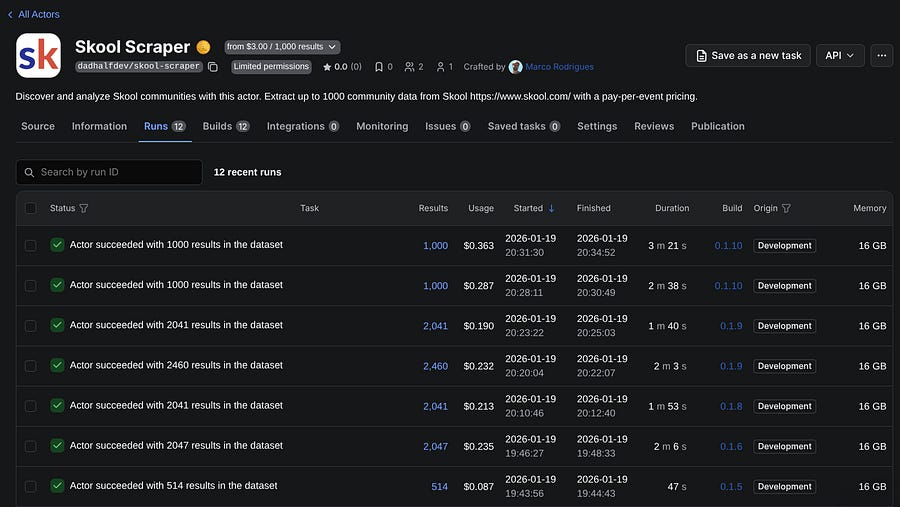
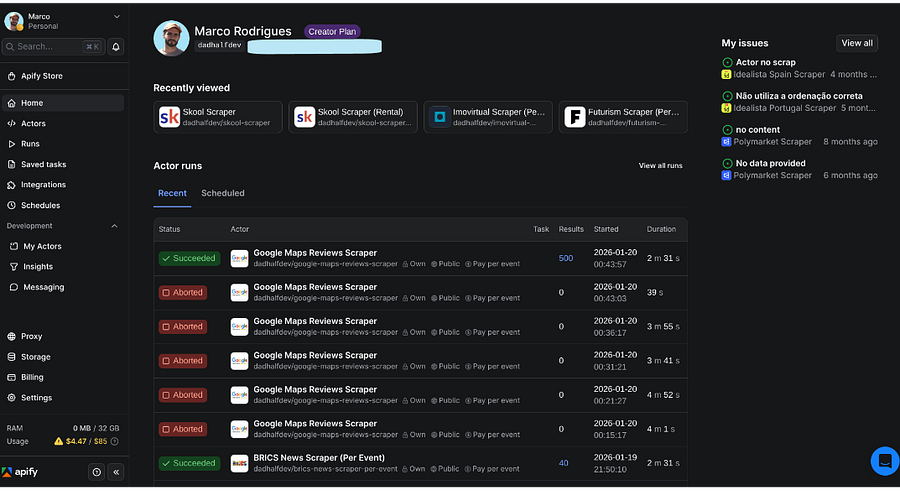
Understand the usage costs of your runs
In the image above, you can see the most recent runs of my Skool Scraper, and the usage costs for each run. Align with that, you can see that I’m using a machine with 16 GB of RAM, which could be the reason driving up costs.
That takes us to another important tab under your actor, which is Settings.
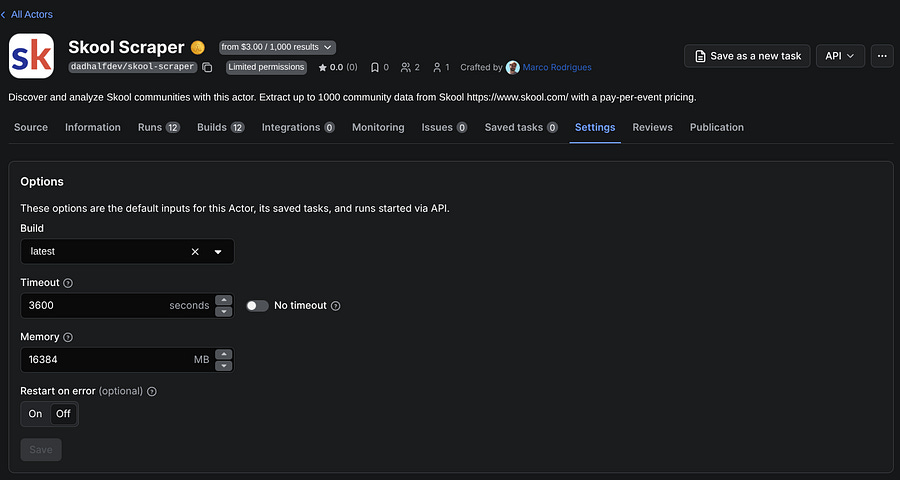
I find this section extremely important because it can make a huge difference in your actor’s speed and overall performance.
By default, Apify sets the RAM to 4 GB. A common scenario is developing a web scraper on a local machine with 16 GB of RAM, submitting the actor to Apify, and suddenly it is either too slow or it is failing because pages take too much time to load. The quick fix? Increase the memory usage of the remote machines.
However, there’s a tradeoff. The more memory you use, the higher your usage costs. For that reason, you should always ensure your actor is monetized above its usage costs to remain profitable.
Make your actor ready for publication
That takes us to the Publication page under your actor, where you can set a monetization plan and customize the display information (title, description, state, and categories).
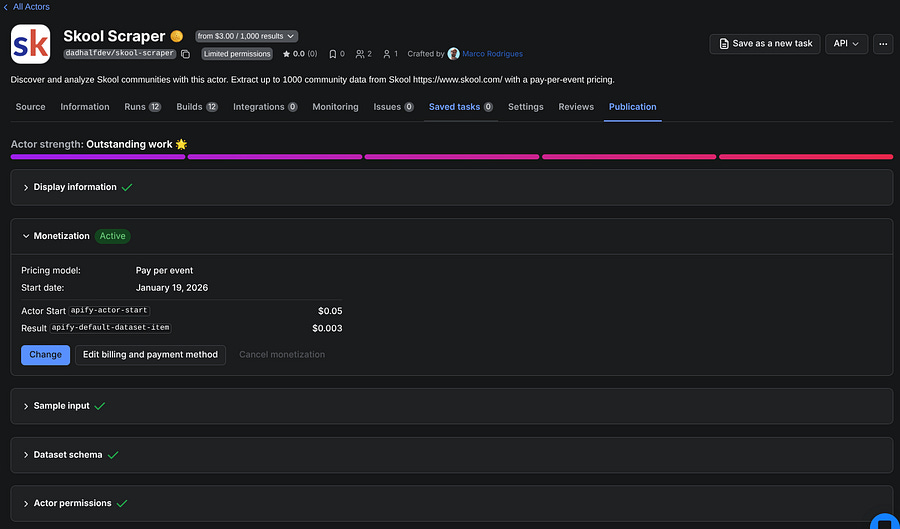
In the image above, you can see other options besides Monetization and Display information, such as Sample input and Dataset schema. These will be green if everything is ok with your actor’s health. We will have a further look into the actor’s schemas
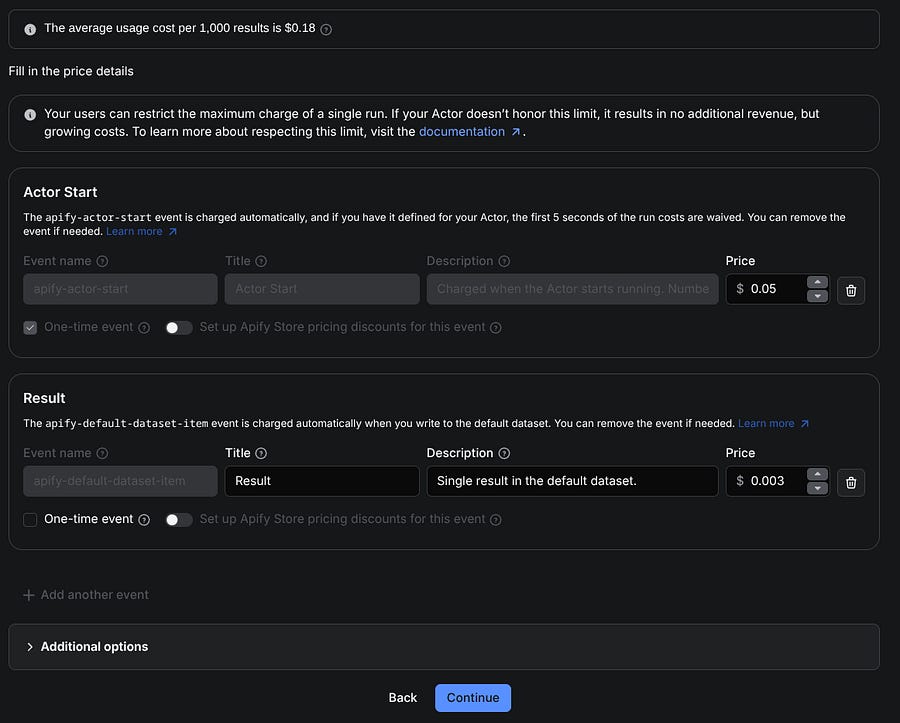
Set a monetization plan for your actor
To monetize your actor, there are two main options: Pay per event or Rental plan.
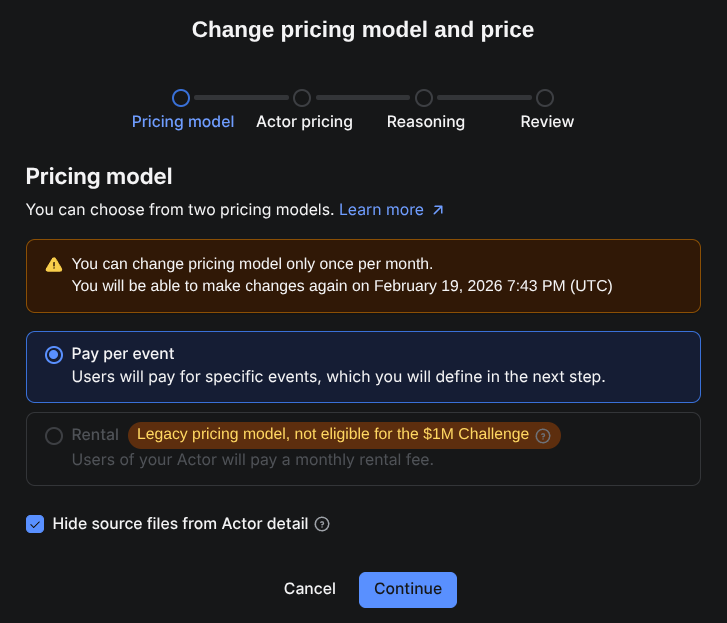
The Rental pricing plan is currently a legacy model, so it’s not clear yet if they will continue with this plan into the future, but it’s the simplest to understand. You basically set a monthly price for your actor, and Apify gets a 20% comission.
The Pay per event plan seems to be the one that Apify’s team is mostly interested in. By default, the plan has two main paid events: starting the actor and obtaining a result. You can see the result as a unity scraped.
The way you add more events depends on your script. We’ll take a quick look at a simple Apify script shortly, but as an example, if you want to create an event called proxy-rotation, you can integrate it into your actor like this:
proxy_list = [
    “<proxy_1>”,
    “<proxy_2>”,
    “<proxy_3>”,
]

for i, proxy_element in enumerate(proxy_list):
    # Charge proxy rotation
    await Actor.charge(”proxy-rotation”)
    Actor.log.info(”Charged proxy rotation”)
After you push the actor to Apify, make sure you add the event proxy-rotation in your Pay per event monetization plan.
You can also offer discounts to customers in higher tiers: bronze, silver, and gold. These are typically larger companies that may spend significantly more on your scrapers, so offering meaningful discounts can be a good strategy.
You can find more about how monetization works here.
Get insights about your actors
Another important tab from the console is the Insights page, where you can have a general view of your actor’s performance and how much you’re being paid for them.
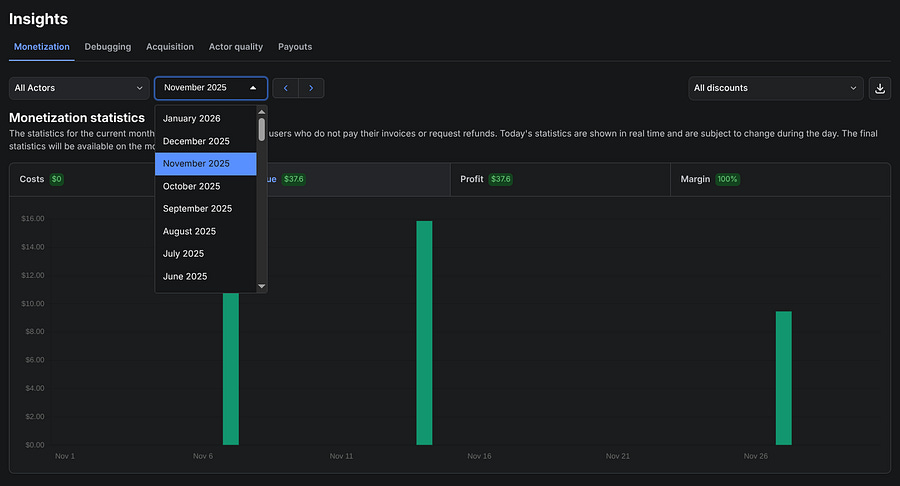
You can filter by month, by actor, and even download the data for further analysis.
On the Acquisition tab, you can find the sources from which customers have found your scraper, along with the countries where your actors were most searched.
Having your Actor among the top SERP results is very important because many customers don’t spend hours looking for the best option on the Apify store. That’s why a strong description and a README file are important to score high on SEO.
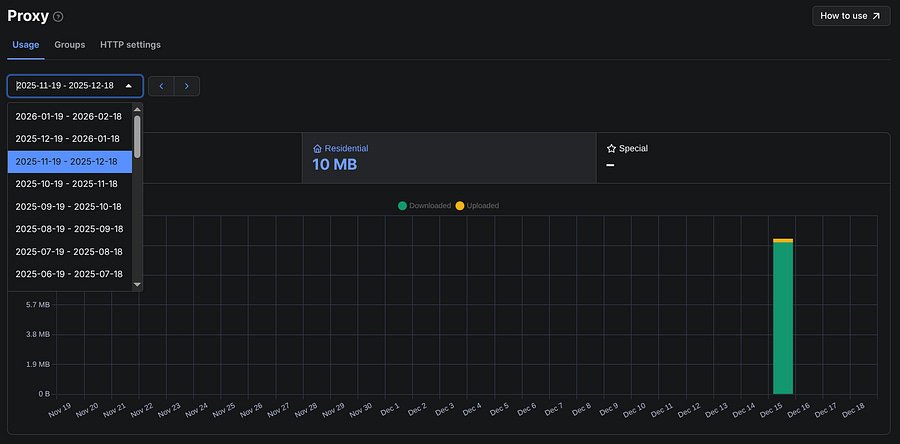
Set up proxies
The Proxies page is convenient for developers who want to use Apify residential or datacenter proxies. Here, you can obtain proxy URLs and monitor their usage.
Build your first actor on Apify
Going back to the actor’s page, you’ll find other important tabs such as:
Information: This contains all the details about your actor that you defined in the README.md file.
Builds: Every time you push a new version to Apify, it will show here if the job succeeded or not.
Integrations: You can connect actors with other actors, or with platforms such as Make and N8N.
Issues: When customers find issues with your actor and write a message, you get notified, but they also appear under this tab.
Reviews: Here you can see and comment on your actor’s reviews.
Monitoring: Dashboard with insights about your actor. You can also go to the Insights page and monitor all your actors from there. We will see that later.
Source: Here you can test your actor, see the last run, the last build, and modify your code directly on the Web IDE.
There are multiple frameworks and libraries to build your actors. You can also use JavaScript or Python, and the possibilities are endless.
Apify recommends using their framework: Crawlee. It handles blocking, crawling, proxies, and browsers, so it may be a good and robust alternative if you’re just starting with web scraping.
I’ve been developing my actors using another stack, mostly with Playwright headless browser and Camoufox.
Here’s an article on how I built my Polymarket scraper using only Playwright:

If you want to get proficient tips and be able to scrape more than 90% of the websites, you can also look at this piece:

Assuming you don’t want to build a crawler now, but you do want to understand the basics, I’m sharing here what you need (in Python).
The first thing is installing the Python SDK:
pip install apifyYou also need to install the Apify CLI to interact and push your code to the cloud.
npm install -g apify-cliThe typical repository of an Apify actor is organized in the following way:
├── .actor
│   ├── actor.json
│   ├── Dockerfile
│   ├── input_schema.json
│   ├── output_schema.json
├── src
│   ├── __main__.py
│   ├── main.py
├── storage
├── README.md
├── requirements.txt
The __main__.py can simply be something like this:
import asyncio
from src.main import main

asyncio.run(main())
The actor.json is a wrapper document. For instance, you can add your input and output schemas directly here, without the need to create two extra files. It also shows how the output fields are organized in your storage. Here’s an example of my TechCrunch scraper:
{
    “actorSpecification”: 1,
    “name”: “techcrunch-scraper-per-event”,
    “version”: “0.1”,
    “buildTag”: “latest”,
    “input”: “./input_schema.json”,
    “output”: “./output_schema.json”,
    “dockerfile”: “./Dockerfile”,
    “storages”: {
        “dataset”: {
            “actorSpecification”: 1,
            “views”: {
                “overview”: {
                    “title”: “Overview”,
                    “transformation”: {
                        “fields”: [
                            “id”,
                            “title”,
                            “link”,
                            “date”,
                            “content”,
                            “author_id”,
                            “author_name”,
                            “author_link”,
                            “category”,
                            “terms”
                        ]
                    },
                    “display”: {
                        “component”: “table”,
                        “properties”: {
                            “id”: {
                                “label”: “ID”,
                                “format”: “number”
                            },
                            “title”: {
                                “label”: “Title”,
                                “format”: “text”
                            },
                            “link”: {
                                “label”: “Link”,
                                “format”: “link”
                            },
                            “date”: {
                                “label”: “Publication Date”,
                                “format”: “date”
                            },
                            “content”: {
                                “label”: “Content”,
                                “format”: “text”
                            },
                            “author_id”: {
                                “label”: “Author ID”,
                                “format”: “number”
                            },
                            “author_name”: {
                                “label”: “Author Name”,
                                “format”: “text”
                            },
                            “author_link”: {
                                “label”: “Author Link”,
                                “format”: “link”
                            },
                            “category”: {
                                “label”: “Category”,
                                “format”: “text”
                            },
                            “terms”: {
                                “label”: “Tags”,
                                “format”: “array”
                            }
                        }
                    }
                }
            }
        }
    }
}
For the same Actor, the input_schema.json looks like this:
{
    “title”:”TechCrunch Scraper (Per Event)”,
    “schemaVersion”: 1,
    “type”: “object”,
    “properties”: {
      “category”: {
        “title”: “Category”,
        “type”: “string”,
        “editor”: “select”,
        “default”: “AI”,
        “enum”: [”Latest”, “Startups”, “Venture”, “Apple”, “Security”, “AI”, “Apps”],
        “enumTitles”: [”Latest”, “Startups”, “Venture”, “Apple”, “Security”, “AI”, “Apps”],
        “description”: “Choose which TechCrunch category to scrape. AI category is highly recommended for the latest artificial intelligence news and trends.”
      },
      “max_posts”: {
        “title”: “Max Posts”,
        “type”: “integer”,
        “default”: 100,
        “minimum”: 10,
        “maximum”: 120,
        “description”: “Maximum number of posts to scrape. Default is 100.”
      }
    },
    “required”: [”category”]
  }
And the same for the output_schema.json:
{
    “actorOutputSchemaVersion”: 1,
    “title”: “Output of techcrunch-scraper-per-event”,
    “description”: “Overview and raw access to scraped TechCrunch properties.”,
    “properties”: {
      “overview”: {
        “type”: “string”,
        “title”: “TechCrunch properties overview”,
        “description”: “Table view using the dataset ‘overview’ view.”,
        “template”: “{{links.apiDefaultDatasetUrl}}/items?view=overview”
      },
      “results”: {
        “type”: “string”,
        “title”: “JSON results”,
        “description”: “All items from the default dataset without view transformation.”,
        “template”: “{{links.apiDefaultDatasetUrl}}/items”
      }
    }
}
Note that the input_schema.json is mandatory to publish the actor, but not the output_schema.json, however it improves the actor quality.
For the Dockerfile, you can just copy mine and use it in all your actors, if you’re going to use Playwright:
FROM apify/actor-python-playwright:3.11
COPY requirements.txt ./
RUN echo “Python version:” \
 && python --version \
 && echo “Pip version:” \
 && pip --version \
 && echo “Installing dependencies:” \
 && pip install -r requirements.txt \
 && echo “All installed Python packages:” \
 && pip freeze
# Install Playwright and its dependencies
RUN playwright install-deps && \
    playwright install
COPY . ./
RUN python3 -m compileall -q .
CMD [”python3”, “-m”, “src”]
As for the main.py file, I won’t go into it here. Otherwise, this tutorial would get too heavy on the coding side. You can always check the example in the article I shared earlier.
Once your Actor is complete, you need to check if your input schema is valid with this command:
apify validate-schemaIf so, you can push it to the platform:
apify pushAfter pushing, you get a link in your terminal to your actor’s page, and you can start editing and making the final adjustments on the platform.
Need help with automation, AI, or data science? Let’s talk.
Conclusion
Apify is not just a platform for web scraping, it also embraces AI agents, automation, and MCP servers. There’s definitely much more to explore beyond what’s covered in this tutorial.
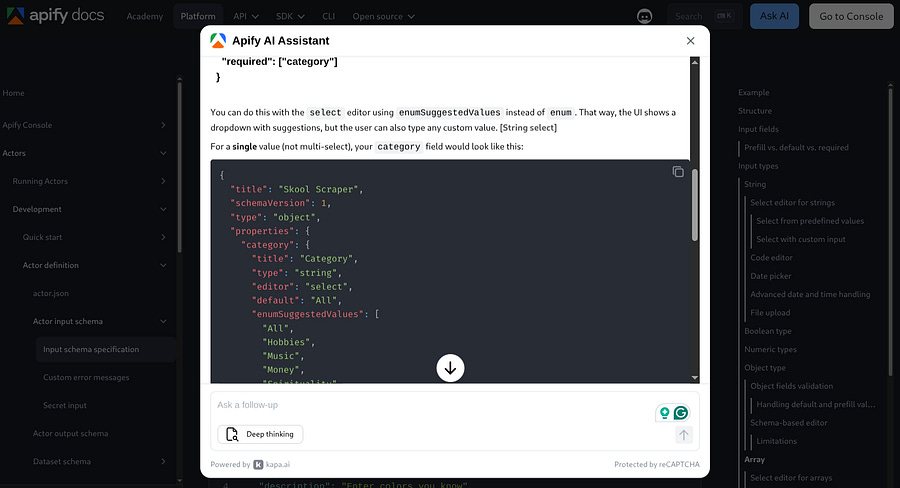
The good news is that you no longer need to spend hours digging through Apify’s documentation page to find what you need. I often use their Ask AI feature to get answers quickly. Sometimes, I even upload my code snippets and ask it to make specific modifications.
With this tutorial, you should no longer feel overwhelmed after creating an account on Apify. You can now navigate the console and understand the most important concepts and steps needed to start monetizing on the platform.
The demand is there, and if you build only one actor per week, after 2 years, that would result in 104 actors generating passive income. I think it is worth a try. What’s stopping you?