
Make $100+ Monthly With Apify Actors
Learn how to monetize your Python web scraping scripts by deploying them on Apify

If you have web scraping scripts sitting idle in your GitHub repository or a folder on your computer, you might be missing out on the chance to earn passive income from them.
With Apify, you can run and upload web scraping scripts, which are called actors. You can build them with either JavaScript or Python programming language, and Apify provides rich documentation in both languages.
But why should you use Apify instead of building your API platform and integrating your web scraping scripts?
Well-known platform: With this marketplace, you can reach a wide audience due to its position in the market. Therefore, you don’t need to spend much energy and money promoting your platform. If you have a fast script, which comes with fair prices and there’s not enough competition, you may be able to monetize it sooner than you thought.
No need for infrastructure: If you want to create your web scraping platform, that comes with costs. You may need to host your script on a VPS and pay a monthly fee, as well as buy a domain for your API endpoint. Not to mention the costs associated with building a website and database. Apify handles the hosting, scaling, and execution of the scripts, saving costs and effort.
Two different types of monetization: You can monetize your actor either with a monthly subscription or a fixed amount for 1,000 requests. The process is extremely simple, all you need is to do is provide your details and associate your PayPal account to start getting paid.
Ensure reliability: Apify has some quality standards that need to be respected, such as your actor shouldn’t take more than 5 minutes to give results. It also provides logs, error reporting, and a robust infrastructure to debug and optimize your script to make it the leading option in the market.
Focus on Development: Due to the robust deployment infrastructure, you don’t need to worry about DevOps and other engineering domains that are required when building your platform. This is great for developers who can solely focus on making a high-quality web scraping actor.
The examples mentioned above are just a few. Apify offers additional benefits, such as reliable customer support and insights into your script’s issues and performance.
While it offers all these perks, diving into the full SDK documentation or trying to grasp the Apify workflow can consume valuable time. That’s why I’ve decided to write this article and provide a straightforward tutorial to help you seamlessly migrate your web scraping script to an Apify actor and begin monetizing your work.
How to create an Apify actor
Before deploying an Apify actor, the first step is to have a functional web scraping script. In this guide, I’ll walk you through the key components of my Polymarket web scraping code, which have been adapted to work with the Apify SDK.
There are two main Apify packages for Python, so make sure not to mix both. They are:
Apify Python Client: The official library for accessing the Apify API, offering features such as automatic retries and convenient utility functions. All requests, responses, and errors are handled in JSON format with UTF-8 encoding. Requires Python 3.8 or higher.
Apify SDK for Python: The library used for building actors on the Apify platform.
To install the Apify SDK for Python via pip:
pip install apifyYou also need to install the Apify CLI to interact and push your code to the cloud.
npm install -g apify-cliOnce the CLI is installed, you must create an account on the Apify website.
Now you can use the CLI to log in from your local machine:
apify loginThis will ask you to authenticate through a token, which you can find in your profile settings or by directly connecting to the console in your browser.
At this point, we can already initialize the repository, even if it does not yet contain the web scraping logic.
apify initThis will create the storage and .actor folders, along with a .gitignore file.
Let’s begin creating our actor by using a default web scraping script as the base. We’ll distinguish between the Actor Script and the Default Script in the following steps.
To make the process easier, let’s create the logic in two main files inside a src folder, which are the main.py and the __main__.py. Overall, the tree of the Actor Script repository should have the following shape:
├── .actor
│   ├── actor.json
│   ├── Dockerfile
│   ├── input_schema.json
├── src
│   ├── __main__.py
│   ├── main.py
├── storage
├── README.md
├── requirements.txt
Step 1 — Create a __main__.py script
In the Default Script of the Polymarket web scraper, I have the following code for the __main__.py inside the src folder.
""" This script launches the Polymarket Scraper"""
# pylint: disable=E0402
import time
import asyncio
import logging
from rich.logging import RichHandler
from main import main

SEARCH_TYPE = "New"
NUM_MARKETS = 40


if __name__ == "__main__":
    # Logging configurations
    logging.basicConfig(
        filename="logs/output.log",
        filemode='w',  # This ensures the file is overwritten each time
        format='%(asctime)s | %(levelname)s: %(message)s',
        level=logging.DEBUG)
    logger = logging.getLogger()

    # Create a RichHandler for nice formatting
    rich_handler = RichHandler()
    logger.addHandler(rich_handler)

    asyncio.run(main(logger, SEARCH_TYPE, NUM_MARKETS))
So you can see that in this file I created a logger object and I run the main scraping function asynchronously, which takes the logger, a search type, and the number of markets to scrape as inputs.
The Actor Script will be as simple as this:
import asyncio
import time
import logging
from apify.log import ActorLogFormatter
from src.main import main, Actor

handler = logging.StreamHandler()
handler.setFormatter(ActorLogFormatter())

apify_logger = logging.getLogger('apify')
apify_logger.setLevel(logging.DEBUG)
apify_logger.addHandler(handler)

asyncio.run(main())
The logger is defined using the Apify instance instead, and no inputs are used in the main function because they will be defined inside it, as we are going to see in the next step.
Step 2 — Create a main.py script
As we have seen previously, the main function takes three inputs, and looks like this for the Default Script:
""" This script contains the function to scrape Polymarket """
# pylint: disable=W0718
# pylint: disable=W0621
import json
from playwright.async_api import async_playwright

async def main(logger, search_input, num_markets):
    """ Main function to scrape Polymarket """
    async with async_playwright() as pw:

        # Creates an instance of the Chromium browser and launches it
        browser = await pw.chromium.launch(headless=False)

        # Creates a new browser page (tab) within the browser instance
        page = await browser.new_page(locale='en-US')
        logger.info("Open Polymarket")
        if search_input == "Top":
            await page.goto("https://polymarket.com/markets/all")
            await page.wait_for_timeout(4000)
        if search_input == "New":
            await page.goto(
                "https://polymarket.com/markets/all?_s=start_date%3Adesc")
            await page.wait_for_timeout(4000)


        # Collect results in the loop
        for i in range(round(num_markets / 20)):

            # Iteration number
            logger.info("Iteration Number: %s", i)

            # Get response
            page.on(
                "response", lambda response: check_json(response, logger))

            # Scroll down
            await page.locator(
                ".c-dhzjXW.c-dhzjXW-idNOCmT-css"
            ).last.scroll_into_view_if_needed(timeout=5000)

            await page.wait_for_timeout(2000)

        # All markets
        all_markets = []

        # Read and process each row
        with open('temp.json', 'r', encoding='utf-8') as json_file:
            for line in json_file:

                # Parse each line as a JSON array
                row = json.loads(line.strip())

                # Process each dictionary in the row
                for dictionary in row:
                    all_markets.append(dictionary)

        # Get the sample for the output
        markets_sample = all_markets[:num_markets]

        if markets_sample:
            logger.info("Scraping Succeeded!")
            with open("result.json", 'w', encoding="utf-8") as f:
                json.dump(markets_sample, f, indent=4)

        await page.close()
At the end of the script, we see that the scraped information is saved in the result.json file, with the Actor Script this will be different, instead the results will be stored in the Apify database and available to explore and export in the console.
Let’s see how the script changes for the actor:
""" This script contains the functions to scrape polymarket """
# pylint: disable=W0718
# pylint: disable=W0621
import json
from apify import Actor
from playwright.async_api import async_playwright

async def main():
    """ Main function to scrape Polymarket """
    async with Actor:
        # Read the Actor input
        actor_input = await Actor.get_input() or {}
        search_input = actor_input.get("search_input")
        num_markets = actor_input.get("number_of_markets")

        async with async_playwright() as pw:

            # Creates an instance of the Chromium browser and launches it
            browser = await pw.chromium.launch(
                headless=False)

            # Creates a new browser page (tab) within the browser instance
            page = await browser.new_page(locale='en-US')
            Actor.log.info("Open Polymarket")
            if search_input == "Top":
                await page.goto("https://polymarket.com/markets/all")
                await page.wait_for_timeout(4000)
            if search_input == "New":
                await page.goto(
                    "https://polymarket.com/markets/all?_s=start_date%3Adesc")
                await page.wait_for_timeout(4000)

            # Clean JSON file
            with open("temp.json", "w", encoding="utf-8") as file:
                pass  # This leaves the file completely empty

            # Collect results in the loop
            for i in range(round((num_markets/2) / 20)):

                # Iteration number
                Actor.log.info("Iteration Number: %s", i)

                # Get response
                page.on(
                    "response", check_json)

                try:
                    # Scroll down
                    await page.locator(
                        ".c-dhzjXW.c-dhzjXW-idNOCmT-css"
                    ).last.scroll_into_view_if_needed(timeout=10000)

                except Exception as error:
                    Actor.log.error(str(error))
                    await page.wait_for_timeout(2000)
                    continue

            await page.wait_for_timeout(2000)

            await page.close()

            # All markets
            all_markets = []

            # Read and process each row
            with open('temp.json', 'r', encoding='utf-8') as json_file:
                for line in json_file:

                    # Parse each line as a JSON array
                    row = json.loads(line.strip())

                    # Process each dictionary in the row
                    for dictionary in row:
                        all_markets.append(dictionary)

            # Drop duplicates
            all_markets = [
                dict(t) for t in
                {tuple(sorted(d.items())) for d in all_markets}]

            # Get the sample for the output
            markets_sample = all_markets[:num_markets]
            Actor.log.info("Total Scraped: %s", len(all_markets))
            Actor.log.info("Sample Length: %s", len(markets_sample))

            Actor.log.info("Scraping Succeeded!")
            await Actor.push_data(markets_sample)
Not so much has changed, but the first thing we notice is that the inputs are defined within the function using the actor_input object. You might be wondering where the strings search_input and number_of_markets were defined. And they actually come from the input_schema.json that we are going to take a look next.
Another change is that all logger objects are replaced by the Actor.log. Finally, as I mentioned, the data is not stored as JSON but pushed instead using the Actor.push_data() function.
Step 3— Create an input_schema.json
When you publish your actor, a proper input schema is needed so the user can have the option to manually insert the right inputs for scraping. The input_shema.json is a file that allows you to customize the entries, and the full documentation can be seen here:
For the Polymarket actor, all I need is a dropdown menu to select the search input and a field to enter the number of markets. Therefore, my structure looks like this:
{
    "title":"Polymarket Scraper",
    "schemaVersion": 1,
    "type": "object",
    "properties": {
      "search_input": {
        "title": "Search Input (Top or New)",
        "type": "string",
        "editor": "select",
        "default": "Top",
        "enum": ["Top", "New"],
        "enumTitles": ["Top", "New"],
        "description": "Search Polymarket for 'Top' or 'New' markets."
      },
      "number_of_markets": {
        "type": "integer",
        "title": "Number of Markets",
        "description": "The number of markets (posts) to be scraped.",
        "default": 100,
        "minimum": 100,
        "maximum": 1500
      }
    },
    "required": ["search_input", "number_of_markets"]
  }
Step 4 — Create a Dockerfile
Since we are using Python, we need a Docker image with a Python version and install some dependencies. For that, you can use this default Dockerfile, which you can also find in the templates repository:
# First, specify the base Docker image.
# You can see the Docker images from Apify at https://hub.docker.com/r/apify/.
# You can also use any other image from Docker Hub.
FROM apify/actor-python-playwright:3.11

# Second, copy just requirements.txt into the Actor image,
# since it should be the only file that affects the dependency install in the next step,
# in order to speed up the build
COPY requirements.txt ./

# Install the packages specified in requirements.txt,
# Print the installed Python version, pip version
# and all installed packages with their versions for debugging
RUN echo "Python version:" \
 && python --version \
 && echo "Pip version:" \
 && pip --version \
 && echo "Installing dependencies:" \
 && pip install -r requirements.txt \
 && echo "All installed Python packages:" \
 && pip freeze

 # Install Playwright and its dependencies
RUN playwright install-deps && \
    playwright install

# Next, copy the remaining files and directories with the source code.
# Since we do this after installing the dependencies, quick build will be really fast
# for most source file changes.
COPY . ./

# Use compileall to ensure the runnability of the Actor Python code.
RUN python3 -m compileall -q .

# Specify how to launch the source code of your Actor.
# By default, the "python3 -m src" command is run
CMD ["python3", "-m", "src"]
The final step is to customize the actor.json. Let’s see what you can do!
Step 5— Customize the actor.json and deploy the actor
Previously, when we did apify init an actor.json file was created, with a default title, version, and so on, but now we need to specify the right project’s title, the path for the Dockerfile, and the path to the input schema. In addition, you may want to have a structured output for the user, and that is also configured in this file. For that, you need to label and give a format to all the output variables. Let’s see an example of actor.json:
{
    "actorSpecification": 1,
    "name": "polymarket-scraper",
    "version": "0.1",
    "buildTag": "latest",
    "input": "./input_schema.json",
    "dockerfile": "./Dockerfile",
    "storages": {
        "dataset": {
            "actorSpecification": 1,
            "views": {
                "overview": {
                    "title": "Overview",
                    "transformation": {
                        "fields": [
                            "market_question",
                            "market_creation_date",
                            "market_end_date",
                            "market_link",
                            "market_description",
                            "market_chance",
                            "market_liquidity",
                            "market_volume",
                            "market_volume_24h",
                            "market_one_day_price_change",
                            "market_yes_price",
                            "market_no_price",
                            "market_spread",
                            "market_closed",
                            "market_rewards_amount",
                            "market_rewards_daily_rate",
                            "market_num_comments"
                        ]
                    },
                    "display": {
                        "component": "table",
                        "properties": {
                            "market_question": {
                                "label": "Market Question",
                                "format": "text"
                            },
                            "market_creation_date": {
                                "label": "Market Creation Date",
                                "format": "date"
                            },
                            "market_end_date": {
                                "label": "Market End Date",
                                "format": "date"
                            },
                            "market_link": {
                                "label": "Market Link",
                                "format": "link"
                            },
                            "market_description": {
                                "label": "Market Description",
                                "format": "text"
                            },
                            "market_chance": {
                                "label": "Market Chance",
                                "format": "text"
                            },
                            "market_liquidity": {
                                "label": "Market Liquidity",
                                "format": "number"
                            },
                            "market_volume": {
                                "label": "Market Volume",
                                "format": "number"
                            },
                            "market_volume_24h": {
                                "label": "Market Volume 24h",
                                "format": "number"
                            },
                            "market_one_day_price_change": {
                                "label": "Market One Day Price Change",
                                "format": "number"
                            },
                            "market_yes_price": {
                                "label": "Market Yes Price",
                                "format": "number"
                            },
                            "market_no_price": {
                                "label": "Market No Price",
                                "format": "number"
                            },
                            "market_spread": {
                                "label": "Market Spread",
                                "format": "number"
                            },
                            "market_closed": {
                                "label": "Market Closed",
                                "format": "text"
                            },
                            "market_rewards_amount": {
                                "label": "Market Rewards Amount",
                                "format": "number"
                            },
                            "market_rewards_daily_rate": {
                                "label": "Market Rewards Daily Rate",
                                "format": "number"
                            },
                            "market_num_comments": {
                                "label": "Market Number of Comments",
                                "format": "number"
                            }
                        }
                    }
                }
            }
        }
    }
}
This is the final step to build your actor, and you can test it locally with the following CLI command:
apify run --purge --input '{"search_input": "Top", "number_of_markets": 100}'Your output will be stored in the storage folder previously created. If everything works smoothly, you can finally deploy to the Apify cloud instance:
apify pushSometimes you may see some errors in the console that you didn't get locally. It may be related to your input schema, thus make sure the file is properly configured with this command:
apify validate-schema Publish and test the actor on Apify
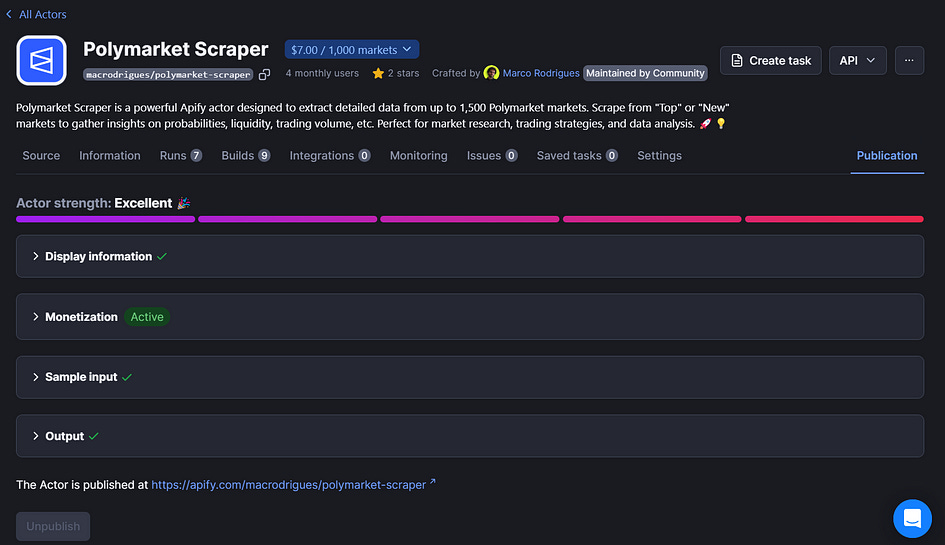
Now, everything should be properly configured in the repository. But in order to publish your actor, you must add display information and a monetization plan like below:
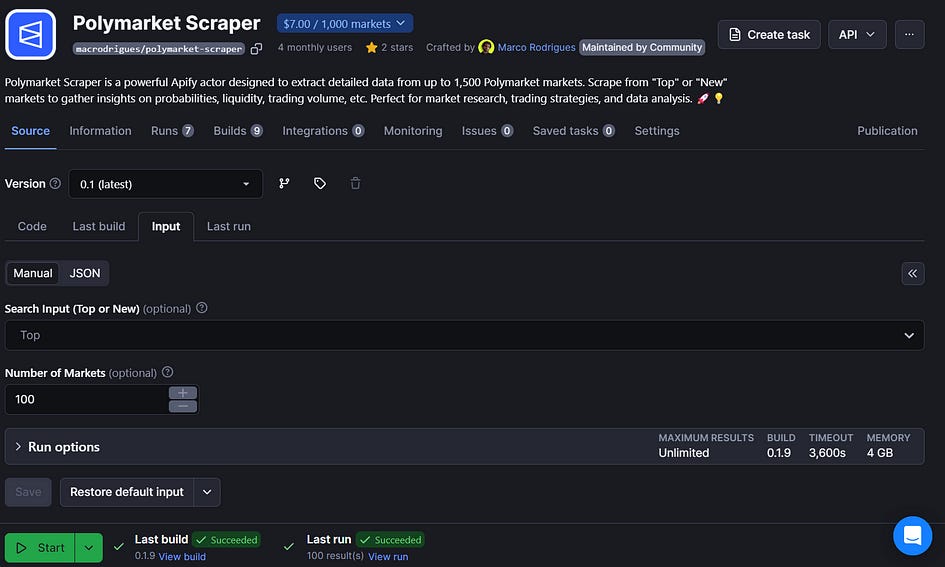
Once your actor strength is excellent, you can test it for free in the Apify console.
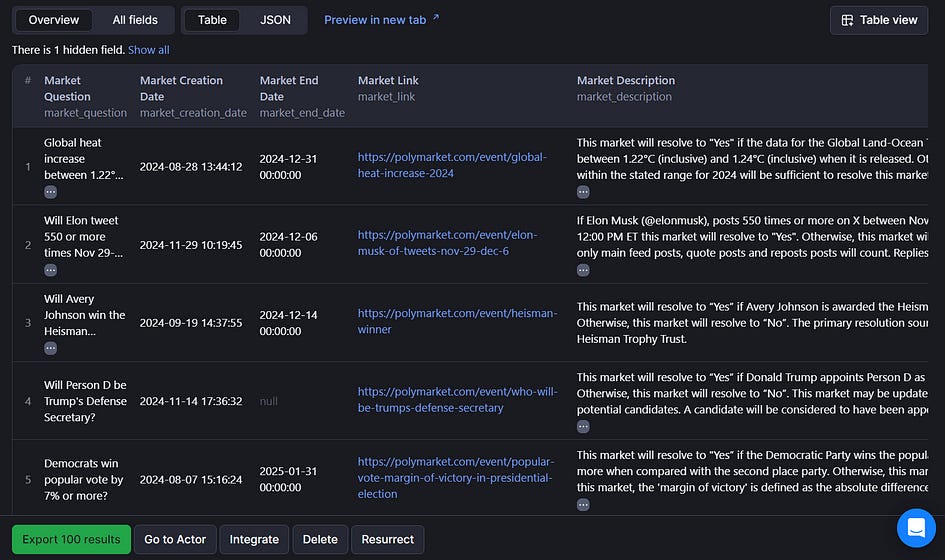
With the output structure I’ve defined in the actor.json file, I get the following table:
The actor will pass through some quality checks, and if any significant issues are found, you’ll receive a notification indicating that the actor is under maintenance and requires updates. Otherwise, you’re all set, and your web scraping script is ready to be monetized and made available to users worldwide!
Need help with automation, AI, or data science? Let’s talk.
Conclusion
After following this tutorial, you realise that creating an Apify actor isn’t too complicated. You can preserve most of your default web scraping script, with only some parts that need to be replaced by the SDK.
Nonetheless, it is worth paying special attention to the actor.json structure and the input_schematic.json so that your deployment doesn’t cause any issues. Also, make sure that your README.md file clearly explains your web scraping inputs and outputs.
With that being said, there’s no need to leave your scripts gathering mold, you can just deploy them on Apify, and maybe someone, somewhere, will make good use of them.