
10 Tips to Make Your Life Easier With OpenClaw
Learn the most useful commands, how to install skills, create sub-agents, use the dashboard, and much more.

The first time I used OpenClaw, the best I could do was set up reminders and check the weather.
Then I decided to add a web search tool, so I connected Perplexity Sonar, and Google became my second search engine.
That was still not enough. I needed information in real time, not SERP results. So I decided to connect the agent to web scrapers through the Apify MCP and get the most recent news on tech, politics, and crypto.
The exploration continued until I was hired to set up OpenClaw for a client.
He asked me to add the agent to Slack and connect it to Google Ads, so the team could extract and manipulate marketing data directly from a channel.
At that time, there wasn’t a reliable SKILL.md on ClawHub for Google Ads, so I created one from scratch. I didn’t just vibe-code it. I actually built Python functions to interact with the data in a safer way, and then wrote the markdown file containing the instructions for the LLM (Large Language Model).
That was all at that time, until I started to see people building crazy stuff on X (former Twitter) with OpenClaw. At first, I thought most of it was fake or exaggerated, but the more I learned about it, the more I realised how powerful it actually is.
In this article, I’ll share 10 tips that will help you build real use cases, not only simple reminders on Telegram.
Set up the OpenClaw AI agent
You can jump this section if you already have OpenClaw installed on your machine and you’re mostly curious about the tips.
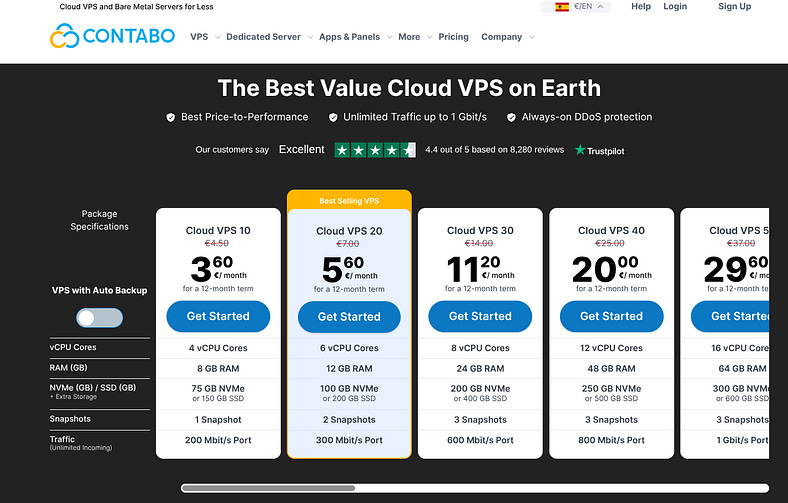
For those who are just starting, I recommend using a remote VPS instead of your personal computer. You don’t want to risk exposing your personal information.
Also, you don’t need to buy a Mac Mini, nor a very expensive machine, to start using OpenClaw. All you need is a 12 GB RAM and a 200 GB SSD. You can get that for less than $6/month with Contabo’s Cloud VPS 20.
I recommend you use Ubuntu as a Linux distro. For the installation, first make sure you have the latest Node.js version:
curl -o- https://raw.githubusercontent.com/nvm-sh/nvm/v0.40.3/install.sh | bashAnd install a higher version of nvm:
nvm install 24Finally, install OpenClaw with this command:
curl -fsSL https://openclaw.ai/install.sh | bashI’ve previously created a piece that guides you through the onboarding steps. You can find it here:

We won’t cover the onboarding steps here, since this article focuses on turning your agent into a useful tool rather than going deep into the setup.
⚠️ Note: All implementations and prompts I’ll cover in this article were made using the MiniMax M2.5 model with the OpenRouter API. If you pick another model, you may not have the same outputs as I did.
In the next section, we start with the first tip, which covers the most commonly used CLI commands.
1. Save the most important CLI commands
One thing that annoyed me at the beginning was constantly forgetting the CLI commands. So I wrote them down, and now I’m sharing the ones I use most so you don’t have to check OpenClaw’s documentation page every time you need the right command.
In the case you’ve missed the onboarding steps, you can launch it again:
openclaw onboardMost of the time, you’ll be using Telegram or WhatsApp to chat with the agent, but other times, the Terminal UI (TUI) can be very helpful. You can launch it this way:
openclaw tuiOne tool that is often neglected is the dashboard. Once you get your hands on it, you will want to use it often. Here’s the command to launch it:
openclaw dashboardAt some point during your setup, you will want to try different models. You can do it with this command:
openclaw models set <provider/model>And list them with this:
openclaw models listYou also may need to check the status of your OpenClaw server, where you can see general information about it, such as the port where it is listening and the process:
openclaw gateway statusTo check security vulnerabilities, I recommend running an audit often. Maybe once per week, depending on how much you’ve been doing with it. Here’s the command:
openclaw security audit --deepSometimes the agent can hallucinate or enter into loops. The best is to stop the gateway:
openclaw gateway stopYou can start it again with this command:
openclaw gateway startIn other situations, restarting may also be needed. Let’s say you’ve made modifications directly in the openclaw.json. The agent won’t take into account those changes unless you restart the gateway:
openclaw gateway restartI use this last one frequently because, as you get familiar with the repository, you’ll see that some things are simply faster to set up manually instead of asking the agent in the chat. However, when you ask the agent to make modifications, such as installing skills, it automatically restarts the gateway for you, so you don’t need to worry about that.
2. Chat with the agent on Telegram
If you’re reading this, you probably already have your agent connected to Telegram or WhatsApp, but for those who just finished the onboarding process and want to try the following tips, I highly recommend using Telegram.
The process is very simple. You just need these steps:
Open the BotFather on your Telegram app (just search for it).
Write
/newbotin BotFather’s chat.Name your bot.
Copy the API token into your terminal.
You’ll then receive a message from your bot to configure it:
openclaw pairing approve telegram <your_pairing_code>That’s all you can start chatting with it on your smartphone or computer!
On my laptop, I usually use both Telegram and CLI commands. Telegram for instructions and more creative tasks, and the command line for fast implementations or launching the dashboard.
On Telegram’s chat, you click on the Menu button, and you find several commands that can also save you some credits (conversations).
3. Use Perplexity for web search
There are two main tools you can use for web search: the Brave Search API or Perplexity’s Sonar.
I prefer Perplexity’s because I can use the same OpenRouter API token that I already use for other skills and tools.
You can ask the agent to help you set up the web search tool, or you can modify it directly in the openclaw.json file like this:
“tools”: {
  “web”: {
    “search”: {
      “enabled”: true,
      “provider”: “perplexity”,
      “perplexity”: {
        “apiKey”: “sk-or-v1-11d0...”,
        “baseUrl”: “https://openrouter.ai/api/v1”,
        “model”: “perplexity/sonar-pro”
      }
    }
  }
}
Don’t forget to restart the gateway after applying the change.
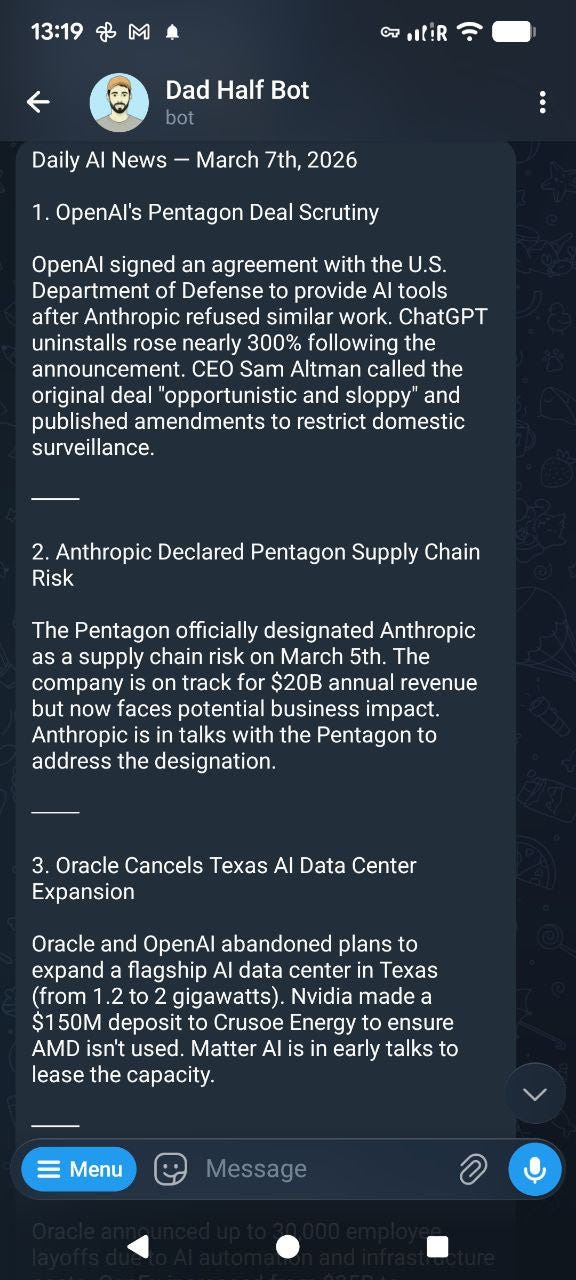
One good use case for the web search tool is to create a cron job that searches the web daily for AI news and displays the summarized information, along with the URL sources, directly in Telegram chat.
Here’s an example of a simple prompt:
I need a cron job that runs daily at 11 am. This is the prompt to schedule:
“Search for the latest AI news. Provide the links for the articles if possible. Show up to 10 important news.”
4. Add Nano Banana 2 to edit and generate images
Unlike the web search tool, adding Nano Banana to your chat interface requires a SKILL.md file.
You can install skills using ClawHub, but you need to be careful with the malicious ones.
This is how you install the ClawHub CLI:
npm i -g clawdhubYou can use it to search skills by terms and keywords:
clawdhub search “nano banana”You’ll find all of these options:
nano-banana-pro  Nano Banana Pro  (3.663)
nano-banana-pro-2  Nano Banana Pro  (3.521)
nano-banana-kling-ad-workflow  Nano Banana Kling Ad Workflow  (3.351)
nano-banana-2  Nano Banana 2  (3.337)
evolink-nano-banana-2  Nano Banana 2 — AI Image Generation (Gemini 3.1 Flash Image, Google, Evolink)  (3.224)
nano-banana-openrouter  Nano Banana Openrouter  (3.182)
evolink-nano-banana-2-1  Evolink Nano Banana 2 1  (3.175)
nano-banana-2-gemini  Nano Banana 2 — Gemini Image Generation  (3.158)
nano-banana-skill  Nano Banana Skill  (3.139)
nano-banana-image-t8  Nano Banana Image T8  (3.113)
You can simply install the one that suits you best, but make sure to read about it on the ClawHub portal before installing.
In this case, I installed the one from Peter Steinberger (the creator of OpenClaw):
clawdhub install nano-banana-proIt uses an older version of Nano Banana, but I modified the file to take the latest model, which is this one:
gemini-3.1-flash-image-previewNote that this feature uses the Gemini API, so it comes with associated costs. However, you won’t need an additional app to generate images. They also don’t include a watermark, and you can schedule them or even automate social media posts.
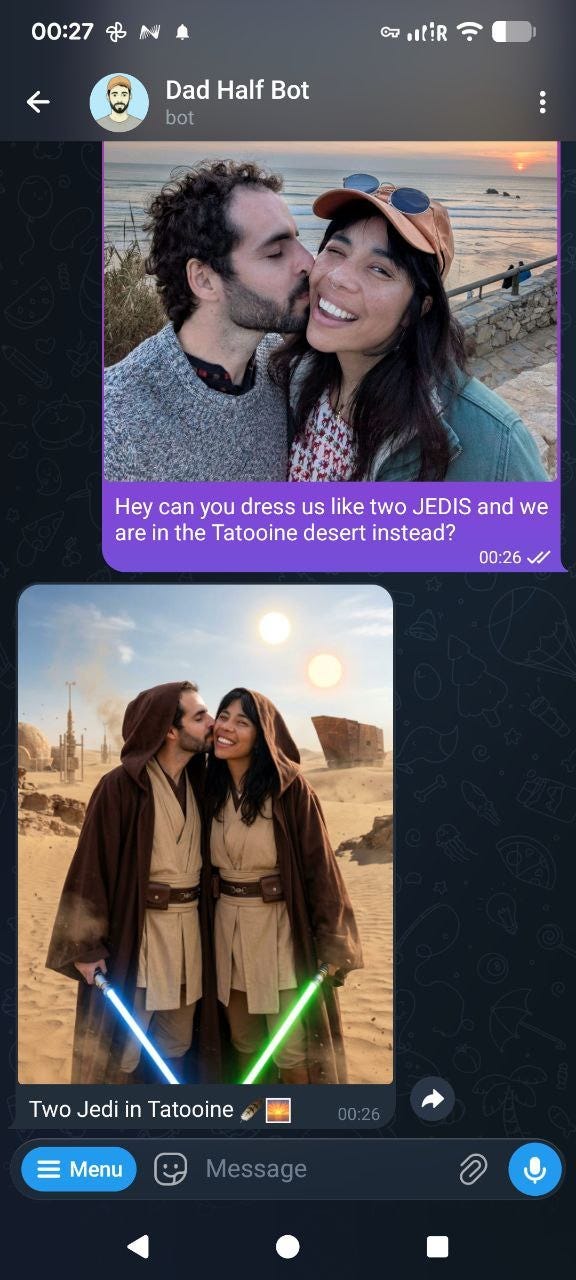
Here’s an example of using Nano Banana 2 on Telegram:
5. Add TTS to your agent’s messages
In some cases, you may be cooking or doing things where you can’t actually read what your agent is saying. That’s why I find it useful to have the Text-to-Speech option.
You can go deep here. There are literally people learning Japanese from their Telegram, using the ElevenLabs API.
We are going to make things simpler and free of costs. By default, OpenClaw uses edge TTS, and you can activate it and give it a voice by modifying this part of the openclaw.json file:
“messages”: {
  “tts”: {
    “auto”: “always”,
    “provider”: “edge”,
    “edge”: {
      “enabled”: true,
      “voice”: “en-CA-LiamNeural”,
      “lang”: “en-US”,
      “outputFormat”: “audio-24khz-48kbitrate-mono-mp3”,
      “pitch”: “-5%”,
      “rate”: “+10%”
    }
  }
}
You can find all available voices in here.
With ElevenLabs, the configuration would look like this:
{
messages: {
tts: {
auto: “always”,
provider: “openai”,
summaryModel: “openai/gpt-4.1-mini”,
modelOverrides: {
enabled: true,
},
openai: {
apiKey: “openai_api_key”,
baseUrl: “https://api.openai.com/v1”,
model: “gpt-4o-mini-tts”,
voice: “alloy”,
},
elevenlabs: {
apiKey: “elevenlabs_api_key”,
baseUrl: “https://api.elevenlabs.io”,
voiceId: “voice_id”,
modelId: “eleven_multilingual_v2”,
seed: 42,
applyTextNormalization: “auto”,
languageCode: “en”,
voiceSettings: {
stability: 0.5,
similarityBoost: 0.75,
style: 0.0,
useSpeakerBoost: true,
speed: 1.0,
},
},
},
},
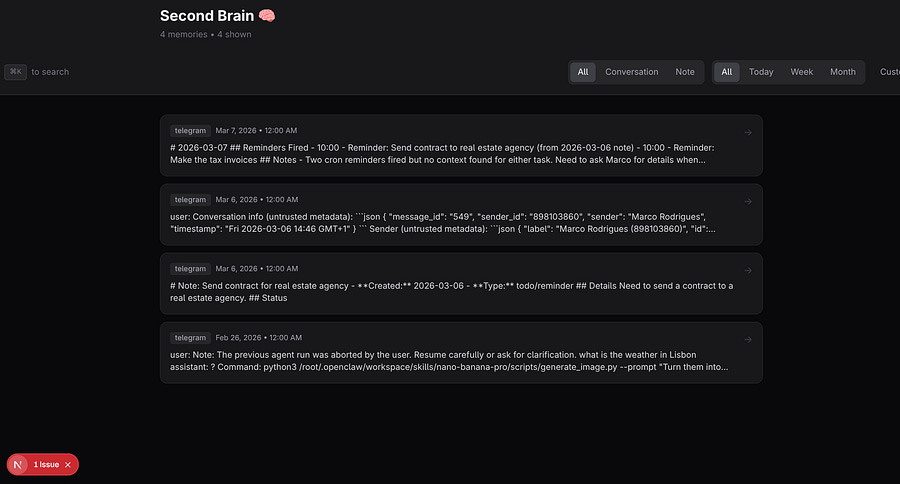
}6. Create a second brain
I found a GitHub repository full of OpenClaw use cases, including a podcast production pipeline, n8n workflow orchestration, personal CRM, and many more. You can find the repository here.
Most use cases require external APIs, but there’s a very useful one that can be implemented with a single prompt: the second brain.
It works similarly to a task planner like Notion. While I like Notion and use it often, there are moments when it feels too slow. For example, I might be in the kids’ park with my daughter when an idea suddenly comes to mind. I don’t want to open Notion, navigate to the task manager, and place the idea in the right column. I want something faster, with minimal effort.
So I usually write messages to myself on Telegram or WhatsApp.
While this works most of the time, I still end up missing some important notes. That’s where the Second Brain becomes handy.
The idea is simple: capture should be as easy as sending a text message, and retrieval should be as easy as searching.
You can, for instance, paste this to your agent:
Hey, remind me to read “Designing Data-Intensive Applications”
Save this link: https://example.com/interesting-article
Remember: John recommended the restaurant on 5th street
And then you can ask it to vibe-code a simple interface, to visualize the notes:
I want to build a second brain system where I can review all our notes,
conversations, and memories. Please build that out with Next.js.Include:
- A searchable list of all memories and conversations
- Global search (Cmd+K) across everything
- Ability to filter by date and type
- Clean, minimal UI
All platforms will look different. This is how mine looks:
7. Connect to MCP servers
There are hundreds of MCP servers that can make your life easier. One GitHub repository that caught my attention is called Awesome MCP Servers.
You can explore it and ask your agent to create a skill based on a specific MCP, only by prompting this:
Can you install this MCP server to act like a SKILL?
In this section, I’m going to show you how you can get data in real time by connecting OpenClaw to Apify’s MCP.
Apify makes this process very simple on its server configuration page.
One task that usually consumes a lot of time is searching for real estate. You may spend hours of your day searching on several platforms for the right property. But in fact, you can just set up your agent to fetch the property listings directly in your chat.
The first thing you need to do is to add the web scrapers (Apify actors) to your MCP server.
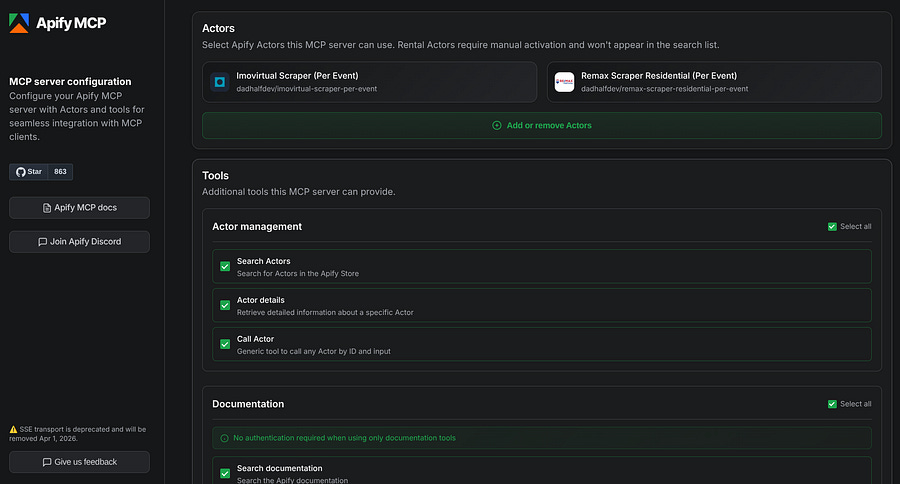
To get the JSON of your MCP, you can go to the bottom of the page and click on JSON config. Finally, you can tell your agent to create a skill with this prompt:
You need to create a SKILL for Apify MCP. This is the JSON configuration you need to use:
{
“mcpServers”: {
“apify”: {
“url”: “https://mcp.apify.com/?tools=actors,docs,get-dataset,dadhalfdev/imovirtual-scraper-per-event,dadhalfdev/remax-scraper-residential-per-event
“
}
}
}For API key use this one:
apify_api_gPW4…
Now we can try to scrape something:
Get up to 20 property listings using the Remax web scraper. You should get me properties in Lisbon, up to 300k. The other parameters don’t really matter at the moment. Please show only the latest 10 properties here, including the property info, the price and the image, along with the URL.
Here’s the ouput (you can see how expensive properties are in Lisbon!):
Here’s the only property I found:
T2 in Moscavide — €300,000
• 51m² • 2 beds • 1 bath
• 📍 Rua Gonçalo Braga
• View property (https://remax.pt/en/imoveis/venda-apartamento-t2-loures-moscavide-e-portela/120181580-2)
• 🖼️ Image: https://i.maxwork.pt/l-view/listings/12018/7113879/bbd4a956-78f0-4d96-84ca-d64e21919adb.jpg
Sometimes the agent won’t output exactly as you want at the first try, and you also need to make sure you provide the right inputs, so always read the actors’ README files before engaging with them if you want to avoid paying more than you need.
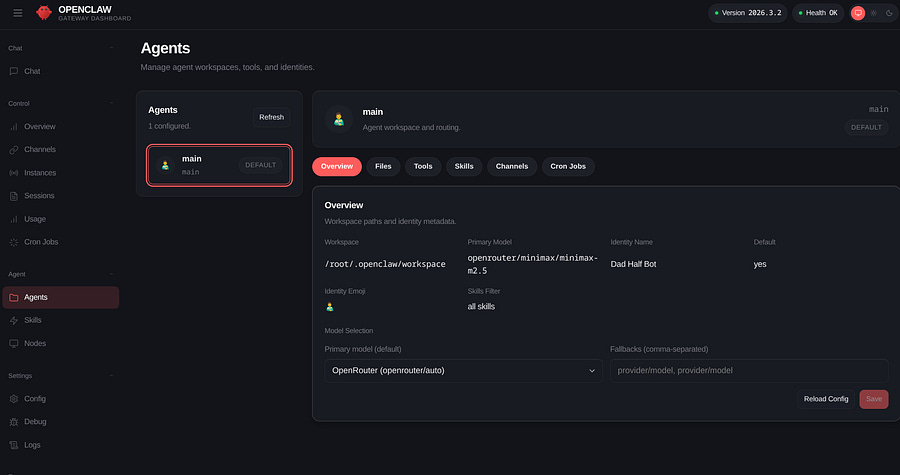
8. Explore the dashboard
One OpenClaw tool that is often overlooked is the dashboard. You can control so many things here that I would probably need to write a dedicated article only for it.
The first feature you see when you run the dashboard command is a chat interface, which you can use instead of Telegram or the Terminal UI.
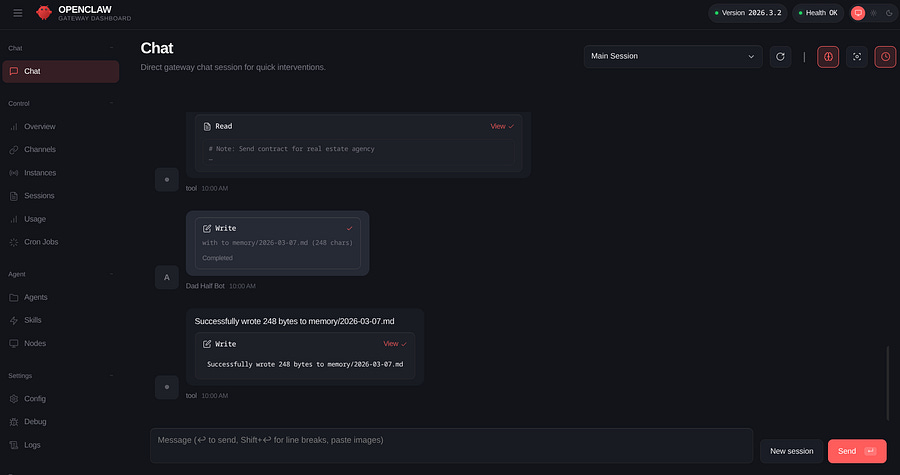
On the left side, you can see all the tabs. For instance, when you schedule something or set up reminders, you’re actually creating cron jobs, which can all be visible on Cron Jobs tab.

You can also remove, add, or modify them directly here, which is faster and doesn’t use LLM credits.
In addition, you can view the outputs here as well. If you clear your Telegram history, you’ll still be able to find the information on your dashboard.
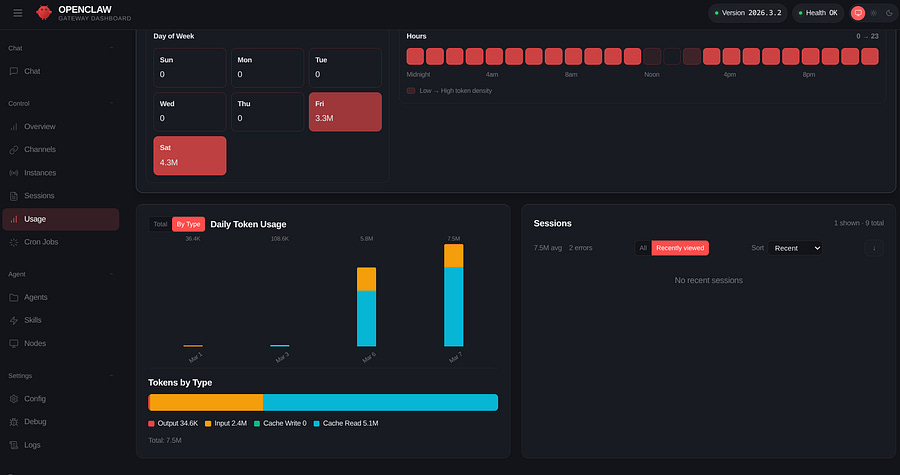
When you start using OpenClaw frequently, one thing you’ll definitely want to keep track of is your LLM costs. In the Usage tab, you can see the costs associated with LLM usage and monitor token activity.
One last feature I like to keep an eye on is the agents and sub-agents. Here, you can see which channels they are associated with, as well as the tools and skills they use.
In the next section, we’ll see how to create sub-agents and add them to specific channels with their own skills.
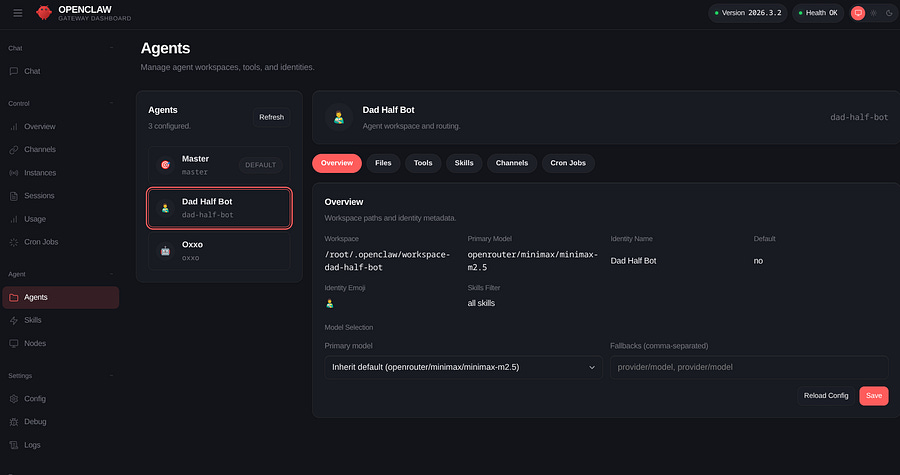
9. Create sub-agents
Creating sub-agents is like managing multiple employees. They all have different skills and tools, and they may or may not communicate with each other.
For security reasons, my agents are more like freelancers: they don’t share any work, and they don’t even know each other. On the other hand, there’s an orchestrator, which I call Master, that can control the sub-agents.
I’ve created one for Telegram called Dad Half Bot, which handles most of my personal tasks and is the one I use for experimentation.
Then I have another one for a Slack channel called Oxxo, which is tailored to handle family-related tasks like our daughter’s medical appointments, household chores, shared ideas, travel plans, and so on.
Creating agents with the chat interface is very simple, but I highly recommend you have a look at the repository to see how they are organized.
When they are created, check on your machine that the agent indeed created a workspace for each of them under the .openclaw folder.
Another way to verify this is by using the openclaw.json file:
“agents”: {
  “list”: [
    {
      “id”: “master”,
      “name”: “Master”,
      “default”: true,
      “workspace”: “/root/.openclaw/workspace”
    },
    {
      “id”: “dad-half-bot”,
      “name”: “Dad Half Bot”,
      “workspace”: “/root/.openclaw/workspace-dad-half-bot”
    },
    {
      “id”: “oxxo”,
      “name”: “Oxxo”,
      “workspace”: “/root/.openclaw/workspace-oxxo”
    }
  ],
  “defaults”: {
    “model”: {
      “primary”: “openrouter/minimax/minimax-m2.5”
    },
    “models”: {
      “openrouter/auto”: {
        “alias”: “OpenRouter”
      },
      “openrouter/google/gemini-2.5-flash-lite”: {},
      “openrouter/minimax/minimax-m2.5”: {}
    },
    “workspace”: “/root/.openclaw/workspace”,
    “compaction”: {
      “mode”: “safeguard”
    },
    “maxConcurrent”: 4,
    “subagents”: {
      “maxConcurrent”: 8
    }
  }
}
And the bindings will show which channels your agents have access:
“bindings”: [
  {
    “agentId”: “dad-half-bot”,
    “match”: {
      “channel”: “telegram”
    }
  },
  {
    “agentId”: “master”,
    “match”: {
      “channel”: “*”
    }
  }
]
Also, check this file after customizing your sub-agents, because you definitely don’t want to see unexpected behaviours and give the wrong permissions to the wrong agent. Also, it’s a good practice to run an audit after these implementations.
10. Create a custom SKILL.md
Throughout this article, we’ve seen that many skills can be created simply by chatting with the agent and providing the right information, such as an MCP or an API key.
Basically, what you’re doing is asking the LLM to vibe code a Markdown file and, in some cases, a Python script.
Depending on the model you’re using, you may come up with a successful skill, but not always. That’s where tweaking the Markdown files, or having a bit of programming knowledge, can be helpful.
In addition, you should never rely 100% on the agent’s output, nor the Skills listed on ClawHub, some can be malicious.
Here’s an example of a skill I’ve created for Google Ads that accesses a Python file that generates only three functions: get_campaign_performance(), get_popular_keywords(), get_device_breakdown().
# SKILL: Google Ads Reporting Agent (Read-Only)

## 🎯 Purpose

This skill enables the AI Agent to retrieve **read-only performance data** from a Google Ads child account via the Google Ads API.

The agent can only use predefined Python functions in `google_ads.py` to fetch reporting data.

---

## 🏗 Google Ads Account Structure

Google Ads uses a **parent-child hierarchy**:

### MCC (My Client Center)
- Agency-level parent account
- Does NOT run ads
- Provides centralized access to child accounts

### Child Accounts
- Actual ad accounts
- Campaigns run here
- Budget is spent here
- API reporting pulls data from these accounts

This skill interacts **only with the child account via the API**.

---

## 🔐 API Permissions & Constraints

- API access level: **Reporting (Read-Only)**
- The agent **cannot**:
  - Modify campaigns
  - Create ads
  - Adjust budgets
  - Pause or enable campaigns
  - Change targeting

- Authentication is handled via `google_ads.yaml`
- The agent must NOT request or expose API keys, tokens, or credentials

---

## 🛠 Available Functions (Only These May Be Used)

The agent may only call functions defined inside:

`google_ads.py`


### Allowed Functions

#### 1. `get_campaign_performance()`
Returns a dataframe of overall campaign performance.

#### 2. `get_popular_keywords()`
Returns a dataframe of top-performing keywords.

#### 3. `get_device_breakdown()`
Returns a dataframe showing device-level performance.

---

## 💻 CLI Usage (argparse)

`google_ads.py` now supports command-line execution with a required `report` argument.

### Supported CLI Arguments

- `performance` → runs campaign performance report
- `keywords` → runs popular keywords report
- `devices` → runs device breakdown report

### Example Commands

- `python google_ads.py performance`
- `python google_ads.py keywords`
- `python google_ads.py devices`

---

## 📤 Output Requirements

- All responses must be presented as **clean, structured tables**
- Do NOT display:
  - Python code
  - Function names
  - Internal implementation details

The user should only see:
- Clear data tables
- Optional short insights or summaries

---

## 🚫 Strict Execution Rules

1. The agent MUST only execute functions inside `google_ads.py`
2. The agent MUST NOT attempt custom queries
3. The agent MUST NOT access external APIs
4. The agent MUST NOT generate synthetic or mock data
5. If a request cannot be fulfilled using available functions, respond with:

> I don’t currently have the capability to retrieve that specific data.

---

## ✅ Supported Query Examples

- Show campaign performance
- Which keywords perform best?
- Give me device-level breakdown
- How are my campaigns doing overall?

---

## ❌ Unsupported Query Examples

- Pause campaign X
- Increase budget by 20%
- Create a new campaign
- Segment by age or gender
- Any request requiring a custom query not covered by the 3 available functions

---

## 🧠 Behavioral Guidelines

- Be concise
- Be data-focused
- Avoid technical explanations
- Provide insights only if helpful
- Never mention internal file names or function logic
- Never expose system configuration

---

## 🖼️ Image and File Display

- When a tool generates a file (e.g., a chart), it must be sent to Slack using the `message` tool.
- The `message` tool **requires** both a `filePath` and a `message` (text content).
- **Correct Usage:** `message(action=”send”, filePath=”path/to/file.png”, message=”Here is your file:”)`
- **Incorrect Usage:** `message(action=”send”, filePath=”path/to/file.png”)` or using inline `MEDIA:` tokens.
Creating custom skills is even more important when setting up OpenClaw within a company, because you need to minimize the exposure of keys and make sure the agent is confined to fetching specific data.
Need help with automation, AI, or data science? Let’s talk.
Conclusion
After reading this article, you should be able to start doing plenty of cool things with OpenClaw. You can also explore further using the two GitHub repositories I shared: one for use cases and another for MCPs.
Using the agent correctly is not only about writing good prompts and seeing things flourish. It’s also about understanding what’s happening on the server side. That’s why using the dashboard and exploring key repository files, such as SKILL.md and openclaw.json, is essential. Otherwise, you may end up building something you can’t fully control and eventually need to hire someone to debug it.
Add skills slowly, and only the ones you truly need. Read them carefully before installing them, and tweak the Markdown files if necessary.
Run audits regularly, and ask for help if things start getting messy. It’s better to involve a software engineer or someone familiar with these setups than risk prompt injection or other malicious activity.