You Need These Tips Before Building Your First Chatbot on Botpress
Don't waste time on Botpress's Discord channel and FAQ, instead, follow this tutorial to build your first chatbot seamlessly.
Botpress is not new. The company has been around for at least two years at the time of writing, but much has changed in how workflows are built.
If you follow tutorials on YouTube, most of them are outdated, with components that are no longer used and a workflow editor that does not resemble the current one.
That’s ok, you can still learn from these videos, at least until you run into certain logical limitations. At that point, a tool designed to be intuitive and beginner-friendly can quickly turn into a real nightmare.
In this tutorial, I’ll show you how to build a chatbot that learns from two different Knowledge Bases (KBs). I’ll also point out the issues that cost me several hours of troubleshooting on Botpress’s Discord channel.
Let’s make Botpress a breeze to use!
1. Create a new agent (aka assistant)
In this example, we are going to use a PDF file about ETH (Ethereum’s currency) and a table with NFT collections as Knowledge Bases. The idea is to create a preview of what could be a powerful crypto and web3 agent, while showcasing key strategies to start building your first workflow.
Let’s start by creating an account on Botpress.
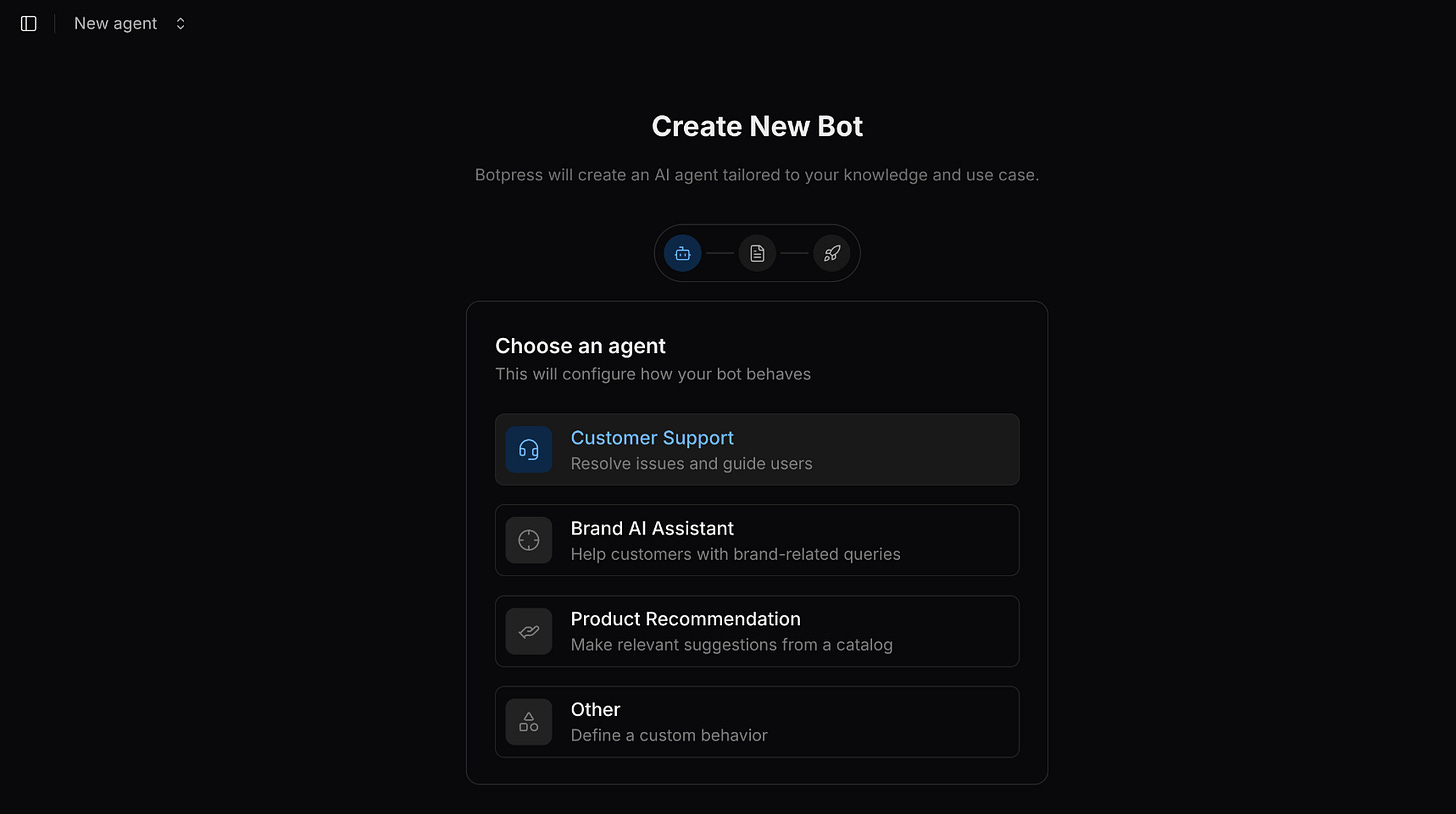
As soon as you create an account, it will guide you to configure an agent tailored for your needs. If you choose Customer Support, Brand Assistant, or Product Recommendation, a workflow will be generated, allowing you to skip some steps.
However, if you want to have full control over your workflow, I recommend using the Other option.
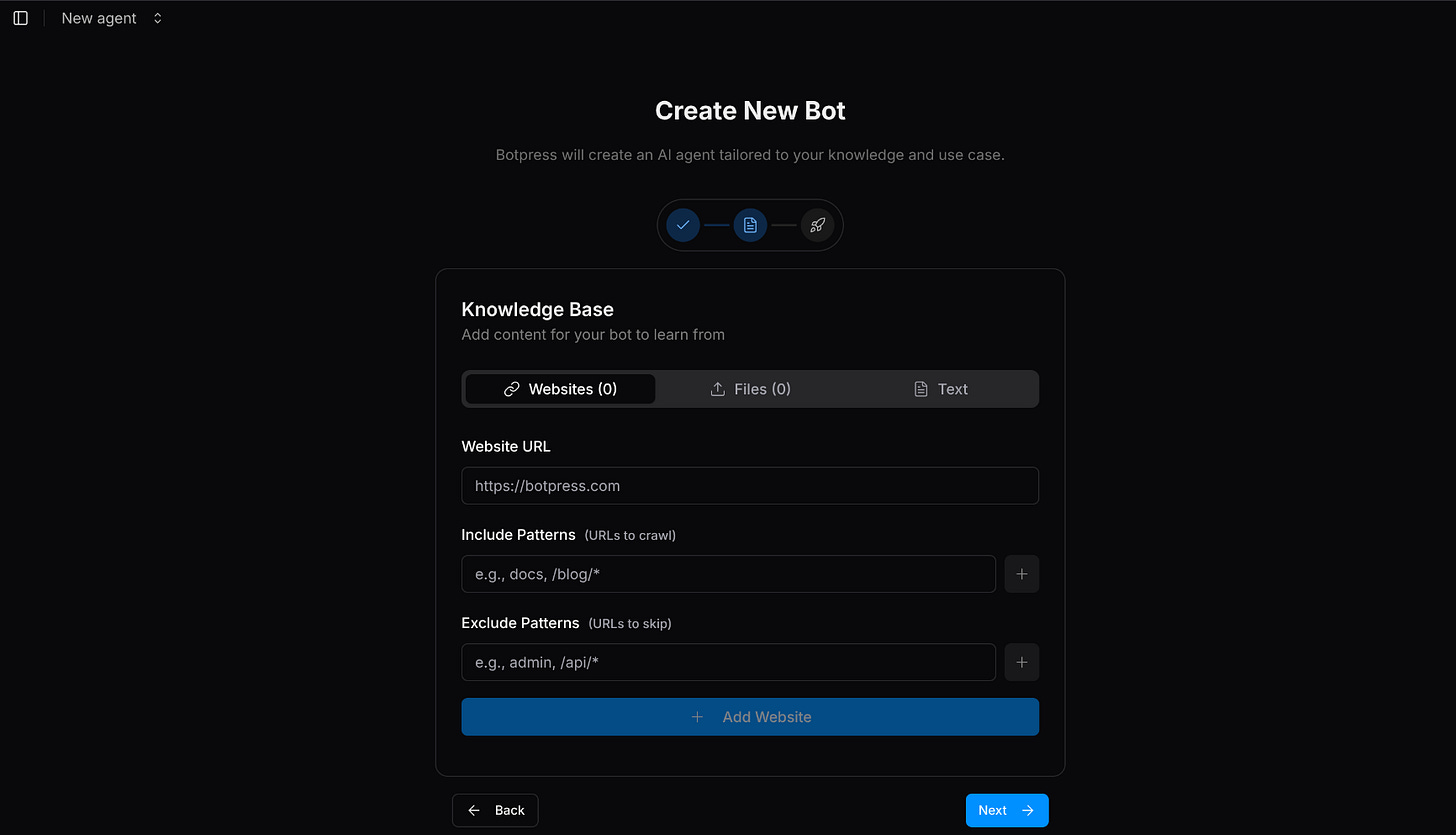
Following the Other option, you will be asked to add data to your Knowledge Base if you want to. You can add websites, files (.pdf, .doc, .html, and more), or simple text.
You don’t need to worry about chunking, indexing, or data preprocessing like you would when coding. The platform handles all of that for you. In this tutorial, we are going to add the files later in the studio page.
In the case you have already selected your KBs and an agent type like Customer Support, you would have at this point a chatbot ready to share or embed in your website (with limitations).
In our case, we have a pretty dumb workflow, so let’s start working on it by clicking Advanced!
2. Add Knowledge Bases (KBs) and Tables
In this tutorial, we are going to make the LLM (Large Language Model) query data from tables and a PDF file.
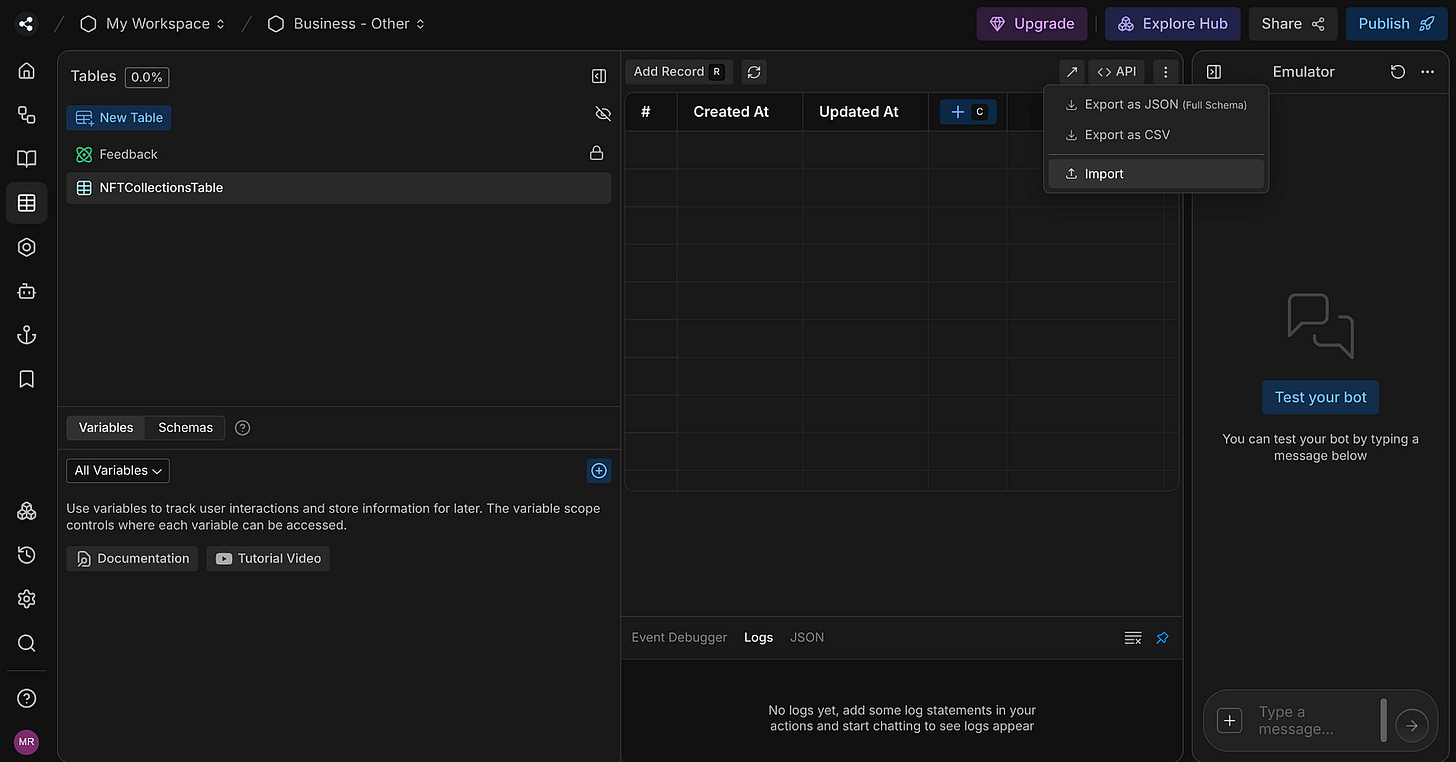
On the left side, you’ll find an icon for tables. Click on it and create a new table.
If you already have a CSV file and don’t want to manually input all the fields into the table, you can use the import option.
Here, I’m going to add a CSV file that was generated using my Magin Eden web scraper. It scrapes the latest information about NFT collections across multiple blockchains and Layer 2 chains.
Here’s a preview of the data I’m adding to the Botpress table:
Once the table is filled, we can move to the KB section. The icon is also on the left side of the studio page.
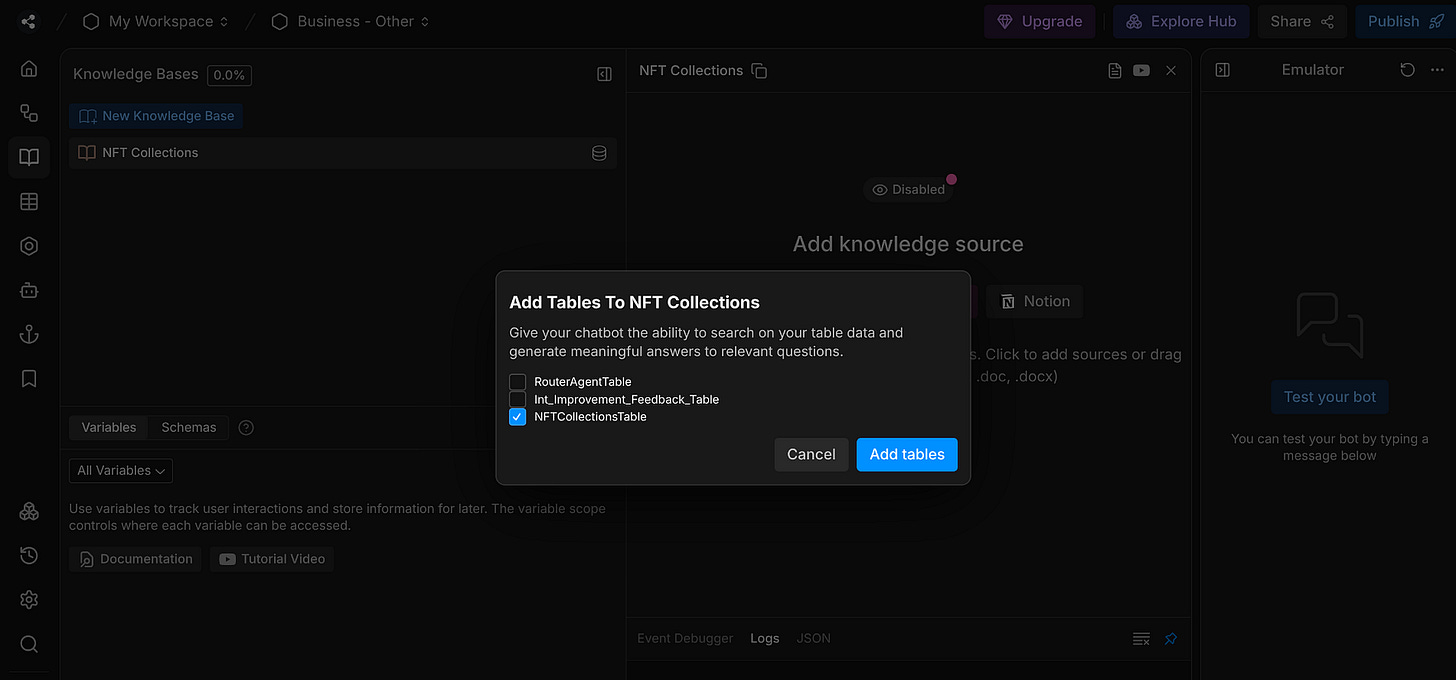
There is a default KB, which you can rename to something that illustrates your table data. Now, click on the tables icon and choose your table. Mine is called NFTCollectionTable.
Now, let’s create a second KB called ETH Info. I’m going to add a simple PDF file that compares the ETH (Ethereum’s blockchain asset) to oil. You can find this file here, perhaps you can even add the link to the KB instead of uploading the document.
3. Build a ready-to-go workflow that works for you
Now comes the amusing part. Building the flow of the chatbot!
On Botpress, the workflows are built using Nodes and Cards. You can see the Nodes as containers that are made of several Cards. The latter are mostly actions and transitions. We will take a look at several card examples in this guide.
You can find the workflows icon on the left side of the studio page. The default example can be messy, and for a good follow-up to this tutorial, I recommend you remove all the nodes by simply clicking on them and pressing Delete.
One thing that I realised when building my first Botpress agent is that when you launch the chatbot, it will always wait for the user's input to start a conversation.
In most cases, that’s fine, but what if you want the chatbot to introduce itself and give a short preview of what it is capable of?
How does the bot start talking before you do?
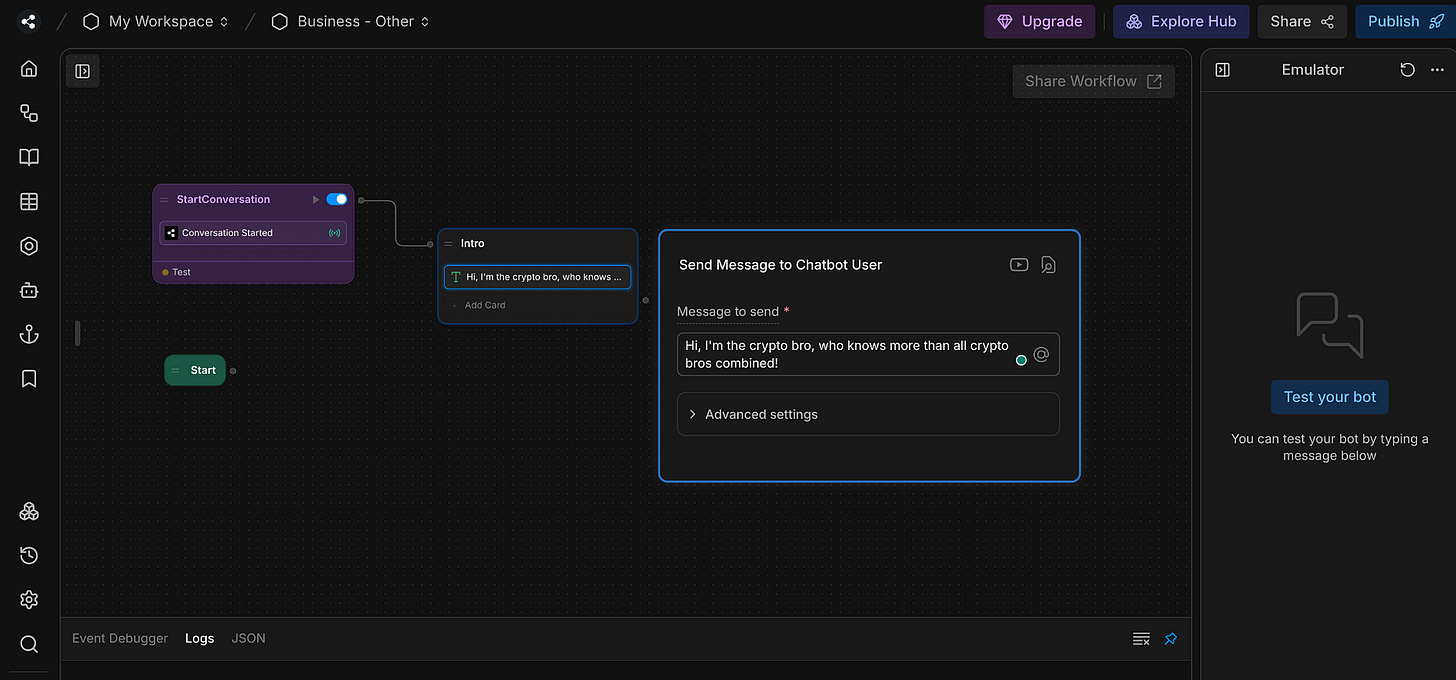
After spending some time on YouTube and Botpress’s Discord channel, I found the solution to this issue. The only thing you need to do is start the workflow from a trigger event called Conversation Started, instead of the default Start node.
While this solution works, there’s still a small delay when you open the chatbot before triggering the intro message.
Add an introduction text and a multiple-choice node
Since we want our chatbot to start the conversation before the user’s input. It would be nice to make a short and funny introduction to break the ice.
Right-click on your mouse to create a node, then insert the card Text. Write something like:
“Hey, I’m the crypto bro, who knows more than all crypto bros combined!”
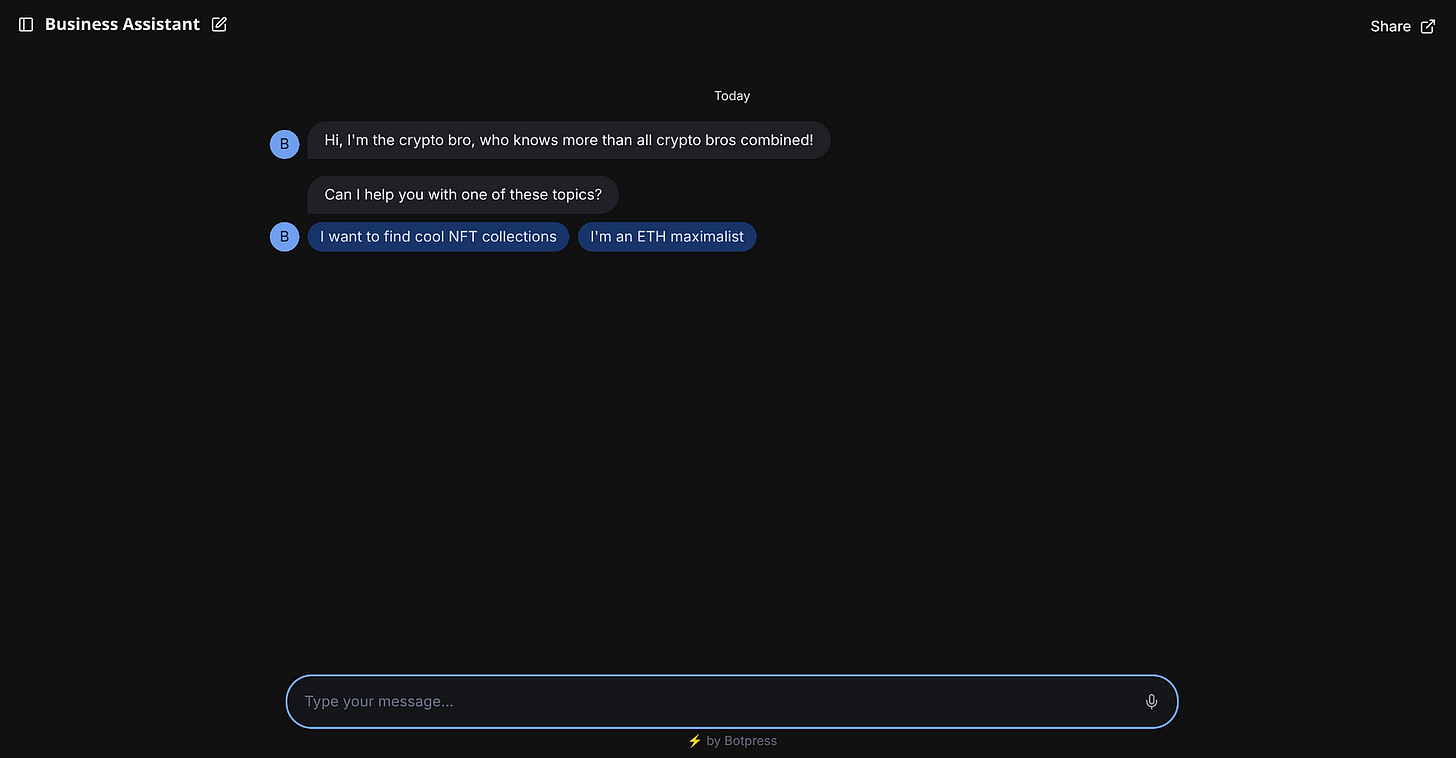
Up to now, there’s no interaction between the user and the agent. Let’s add a Multiple Choice card in the same node, just below the Text card.
This card is also easy to configure, all you need is to make a question and present several options.
In our example, I want to create two paths (two choices), one that is related to NFT collections and another for the Ethereum PDF information.
If you click on publish, in the right corner of the studio page, you’ll get a shareable link, where you can see what you’ve done so far. Otherwise, you can also test it internally by clicking Test your bot on the emulator window.
Add autonomous nodes and exit them
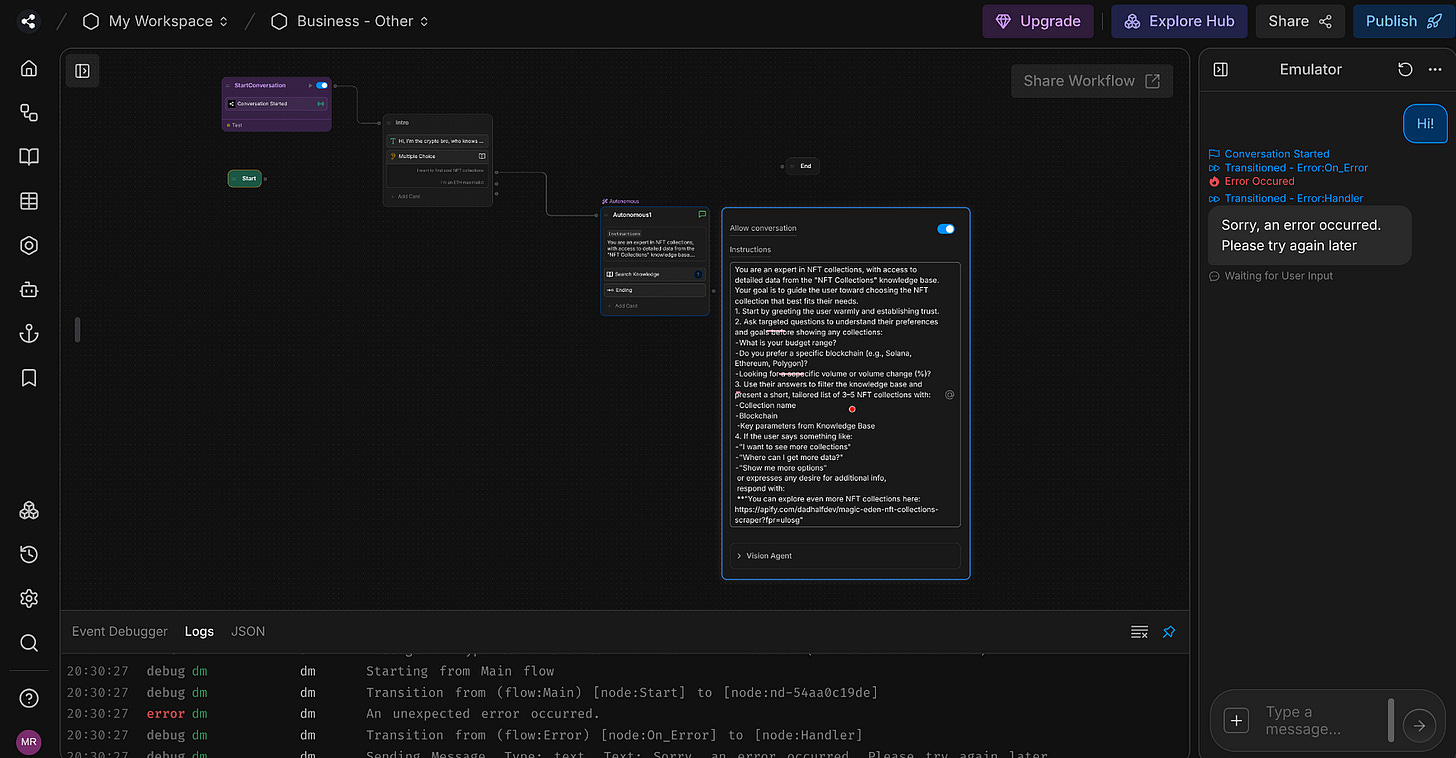
Good, now we have everything settled to put the LLMs to work for us with the Autonomous Nodes. Simply press the right-click on your mouse and select Autonomous Node. Let’s start with the NFT collections.
In the image above, you can see I’ve added the Autonomous Node with two other cards:
Search Knowledge Base: This ensures that the LLM queries all Knowledge Bases or just a specific one. In this case, I’ve set it up to only learn from the NFT collections one.
Transition (“Ending”): This Transition card allows for exiting the autonomous node based on some conditions written in the prompt.
This is how the prompt looks:
You are an expert in NFT collections, with access to detailed data from the “NFT Collections” knowledge base. Your goal is to guide the user toward choosing the NFT collection that best fits their needs.
1. Start by greeting the user warmly and establishing trust.
2. Ask targeted questions to understand their preferences and goals before showing any collections:
— What is your budget range?
— Do you prefer a specific blockchain (e.g., Solana, Ethereum, Polygon)?
— Looking for a scpecific volume or volume change (%)?3. Use their answers to filter the knowledge base and present a short, tailored list of 3–5 NFT collections with:
— Collection name
— Blockchain
—Key parameters from Knowledge Base4. If the user says something like:
— “I want to see more collections”
— “Where can I get more data?”
— “Show me more options”
or expresses any desire for additional info,
respond with:
**”You can explore even more NFT collections here: https://apify.com/dadhalfdev/magic-eden-nft-collections-scraper?fpr=ulosg"**5. If the user seems satisfied or the conversation is coming to a natural close, transition to the “Ending” card below.
Make sure your tone is friendly, knowledgeable, and approachable. Avoid jargon unless the user is clearly an experienced NFT trader.
⚠️ Important Note
Point number 5 is super important! It’s a fix for an issue that I saw many people struggling with (myself included), which is exiting the Autonomous Node. Most likely, you don’t want to speak with the assistant indefinitely, you want to be able to exit when the conversation ends or a specific keyword is mentioned.
The way I saw to solve this is by mentioning the Transition card name in the prompt itself.
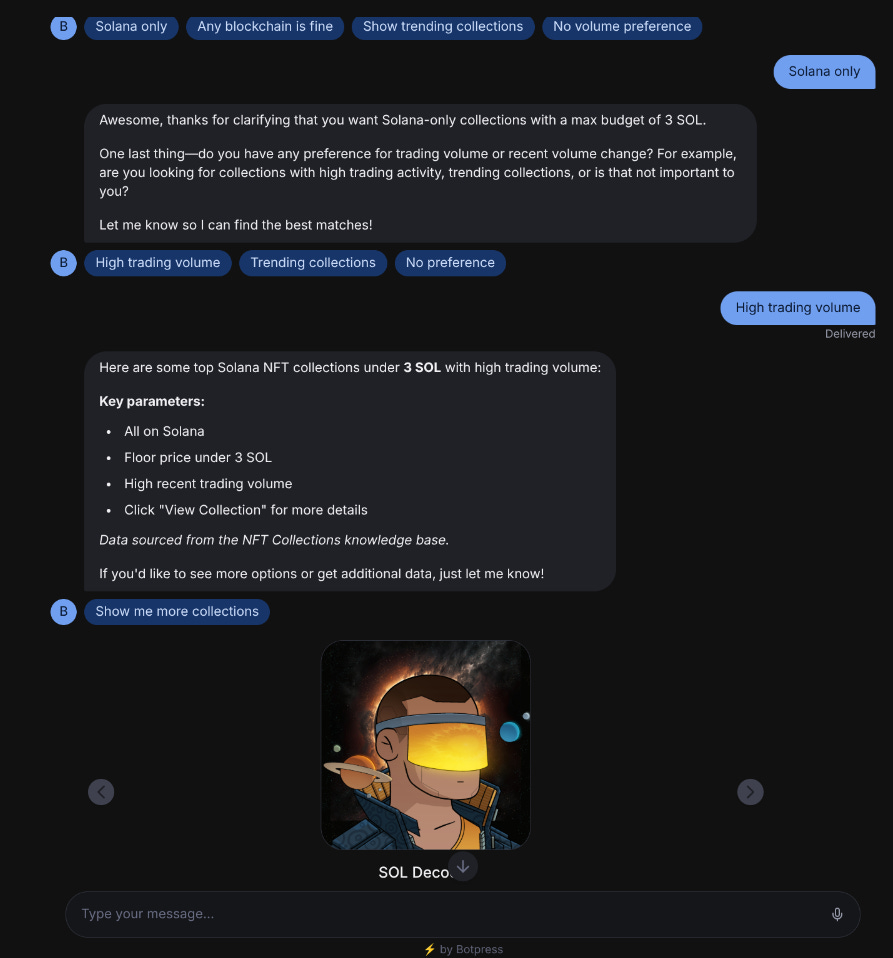
According to the prompt, the chatbot should be able to provide the right NFT collections based on the user's inputs.
When launched, it indeed does that, and even better, it takes the images from the tables and puts the best matches in a horizontal carousel view 🤩
Now we need a second Autonomous Node for the I’m an ETH maximalist option.
In this case, we want to use the KB based on the PDF file we’ve previously uploaded and also create a prompt tailored for this option. In addition, I want to add an affiliate link in the prompt in case the user wants to buy ETH.
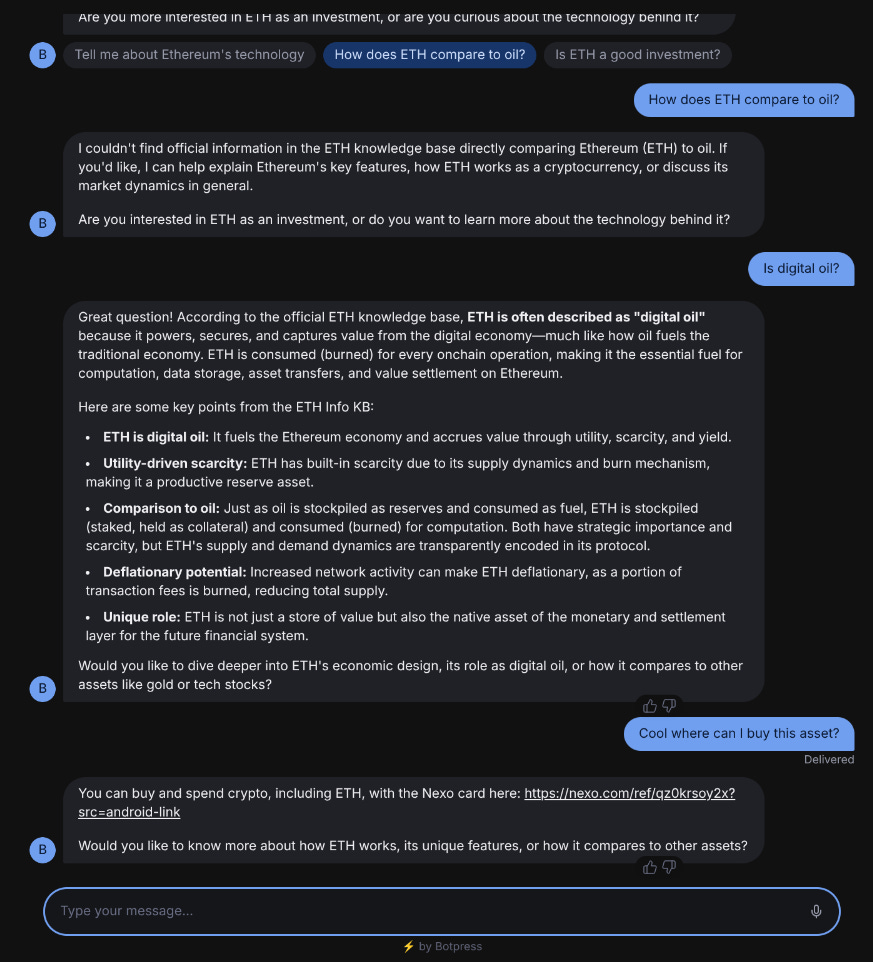
Below is how the ETH branch looks in the chatbot after adding the Autonomous Node.
We can see that it is indeed querying the right KB, and as intended, showing the affiliate link!
Do you need help with automation, web scraping, AI, data, or anything that my laptop can deliver? Feel free to reach me on Upwork! 👨💻
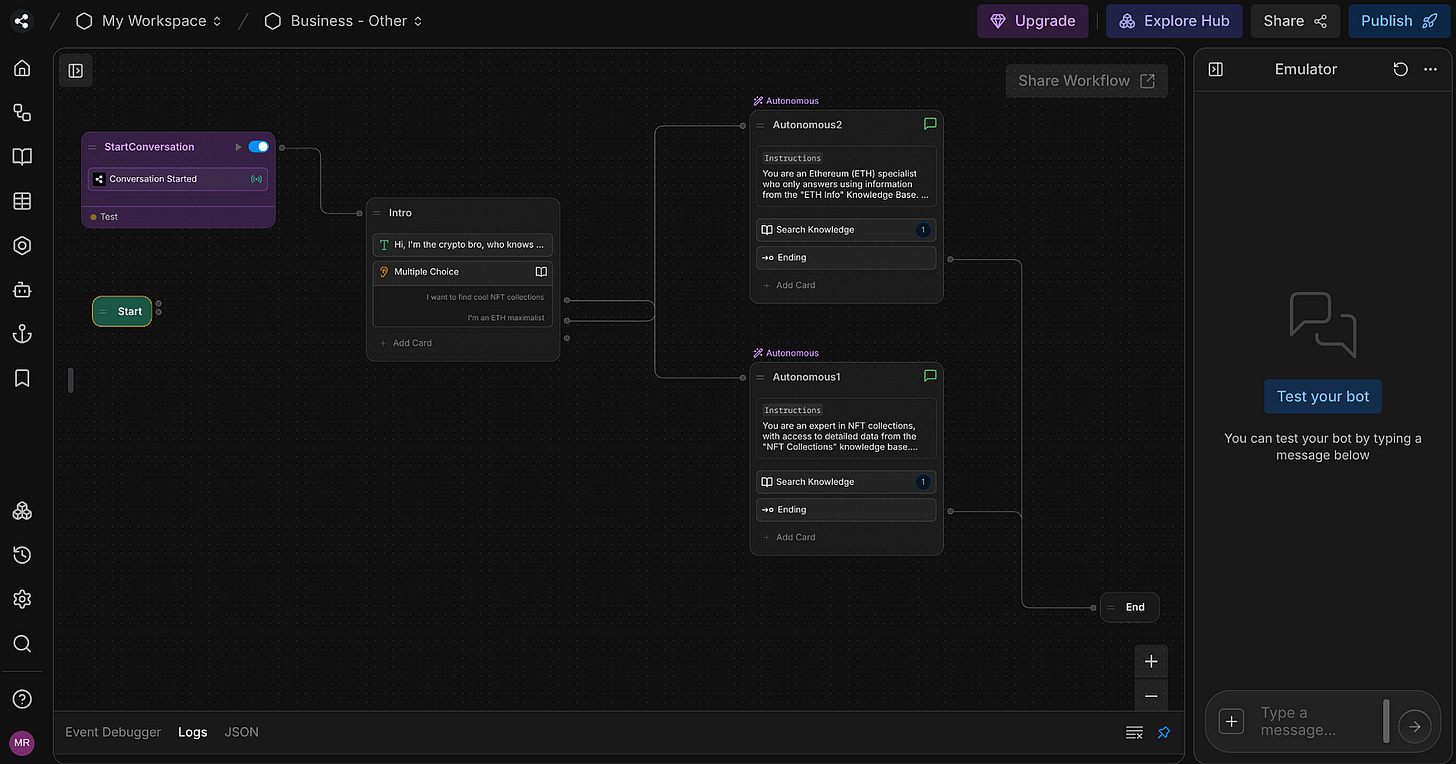
The final workflow looks like this:
You can try the chatbot yourself here. If you want to build yours, visit Botpress’s website and create an account for free:
Conclusion
The final workflow is quite simple, it only contains 4 nodes. But the goal was to guide you through the full process of creating an agent, while highlighting the solutions for two common issues:
“How does the chatbot start the conversation before the user’s input”.
“How to exit the Autonomous Node”.
In the example provided, I used the Conversation Started trigger instead of the Start node at the beginning of the workflow to address the first issue. And I call the Transition Ending in the prompts, in order to exit the nodes.
More transitions could be added, for instance, if the user wants to search the web about a certain NFT collection, we could exit the node on that intent and connect another node with a Web Search card.
Besides, I also wanted to show you how easy it is to do affiliate marketing. If you have a Knowledge Base about electronic or cosmetic products, you can contact providers and add affiliate links while the user engages in a conversation with your chatbot.


