
Learn How to Build a Bot on X Step-by-Step With This Tutorial
Instead of using the X API V2 documentation, make a bot on steroids with these steps.

If you’re here, it’s because you’ve been struggling to find the right X API documentation to post on X (formerly Twitter) seamlessly with Python. Don’t worry, you’re not alone. I found myself in the same situation, and after some time jumping from source to source, I figured out a way to do it, and it’s way easier than I thought!
Previously, I built a bot to automate posts on Bluesky, which is completely free and open-source. While the API is well-documented, it’s slightly harder than the X one.
In this piece, I share a step-by-step tutorial on automating posts on X. You’ll learn how I built a bot that publishes five parenting-related posts per day, using articles scraped from Today’s Parent, and AI images generated using Nano Banana.
Let’s get started!
Create a bot account on X
To get started, you’ll need two X accounts: your main account and a separate one for the bot. I’ll assume you’re already familiar with creating an account on X. The process is identical for the bot, with just one small difference.
The configuration is simple, just open your bot account, head to Settings, then Account Information, and choose Automation. From there, pick your managing account, usually your main one.
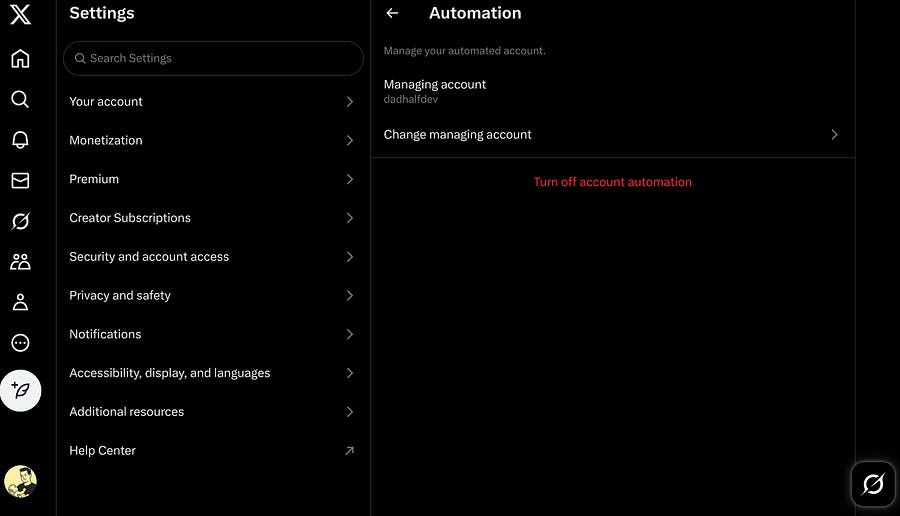
Once done, you should be able to see something like “Automated by @dadhalfdev” in your bot’s profile page.
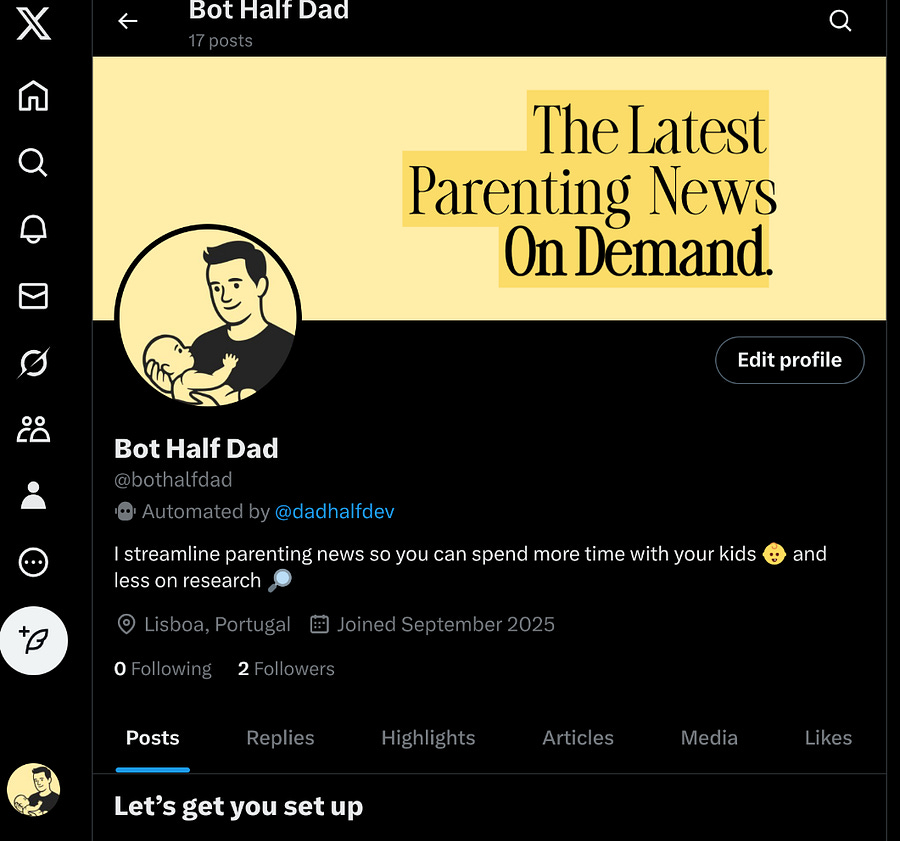
And that’s all to create your bot. Now, we need to give it the right permissions to post.
Go to the X Developer Portal page of your bot’s account. There you’ll find the settings to configure your project.
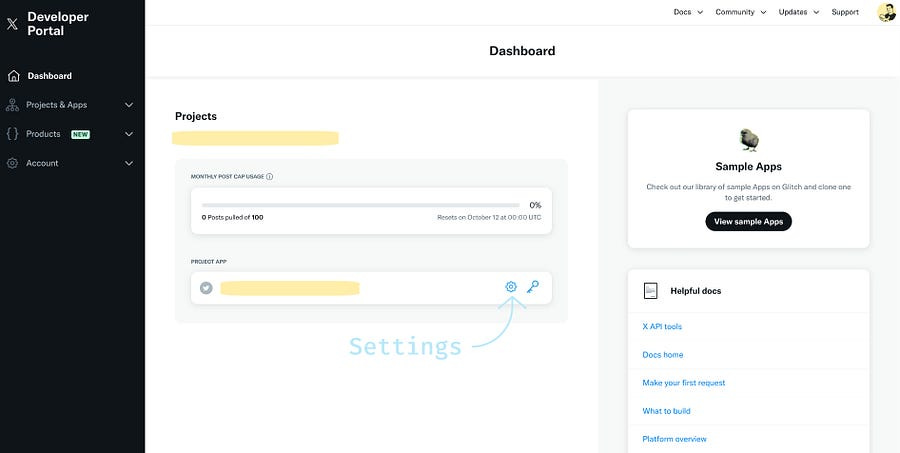
On the settings tab, click on Edit to give your bot the permissions to publish.
⚠️ Note: Make sure you edit your project before using the keys, otherwise, you’ll need to regenerate them.
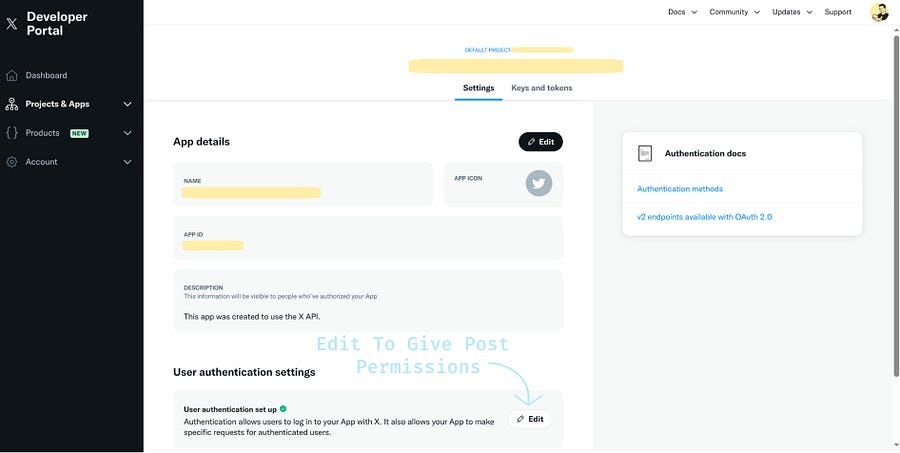
Once clicked, you’ll see the User authentication settings page. Here, in order to post, you need to check the radio button: Read and write and Direct message.
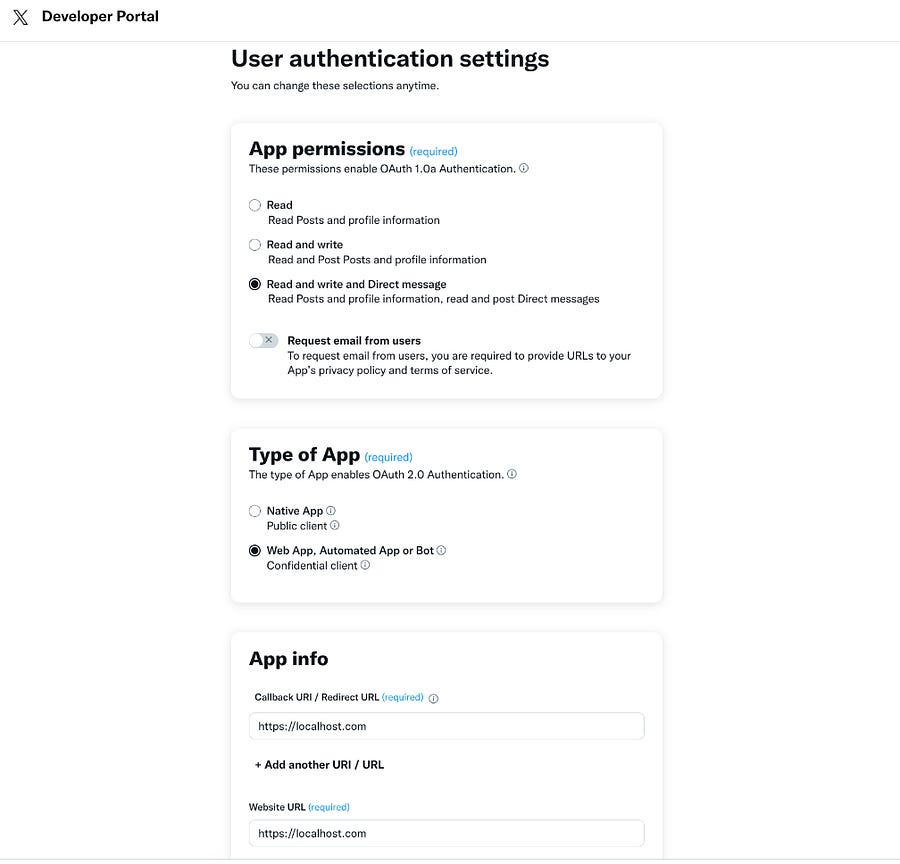
For the type of app, choose the one that includes bot. For the app info, you can use localhost.com for both the Callback URI and Website URL in this tutorial.
Back on the Settings page, you’ll see the Keys and tokens page. There, you will need to generate or regenerate and save them for the API call. To post, you’ll need the following keys and tokens:
Bearer Token: For request authentication.
API Key (Consumer Key): Username that represents your App when making API requests.
API Secret (Consumer Secret): Password that represents your App when making API requests.
Access Token: Token for OAuth 1.0.a API requests.
Access Token Secret: Secret for OAuth 1.0.a API requests.
In this section, we’ve covered how to create an X bot and give it the right permissions. We’re now going to see how to use the credentials above with Tweepy, to seamlessly post on X.
Post on X with Python
If you visit the X API V2 official documentation. You’ll find a setup that can be hard for those who only want to post or retrieve information. The approach used in that documentation uses the Flask framework, but in this tutorial, we’re going to use Tweepy, which makes everything way easier.
First, you need to install Tweepy with this pip command:
pip install tweepyAnd here’s the script to make a simple post on X:
import os
import tweepy
import dotenv
dotenv.load_dotenv()

### AUTHENTICATION ###

# Take these from the Developer Portal
ACCESS_KEY = os.getenv("ACCESS_KEY")
ACCESS_SECRET = os.getenv("ACCESS_SECRET")
CONSUMER_KEY = os.getenv("CONSUMER_KEY")
CONSUMER_SECRET = os.getenv("CONSUMER_SECRET")
BEARER_TOKEN = os.getenv("BEARER_TOKEN")

# Authenticate to X
auth = tweepy.OAuthHandler(
    CONSUMER_KEY, CONSUMER_SECRET, ACCESS_KEY, ACCESS_SECRET)

api = tweepy.API(auth)
try:
    api.verify_credentials()
    print("Authentication OK")
except tweepy.TweepyException as e:
    print(f"Error during authentication: {e}")

### POST IF AUTHENTICATION IS OK ###

client = tweepy.Client(
    consumer_key=CONSUMER_KEY,
    consumer_secret=CONSUMER_SECRET,
    access_token=ACCESS_KEY,
    access_token_secret=ACCESS_SECRET,
)

post = "Hey I'm the Bot Half Dad! Happy to share the latest news about parenting and family life."

response = client.create_tweet(text=post)
print(f"Tweet posted successfully: {post}")
print(f"Tweet posted! ID: {response.data['id']}")
If you want to add an image or a video to your post, you need these extra lines:
img = api.media_upload("your_img.png")
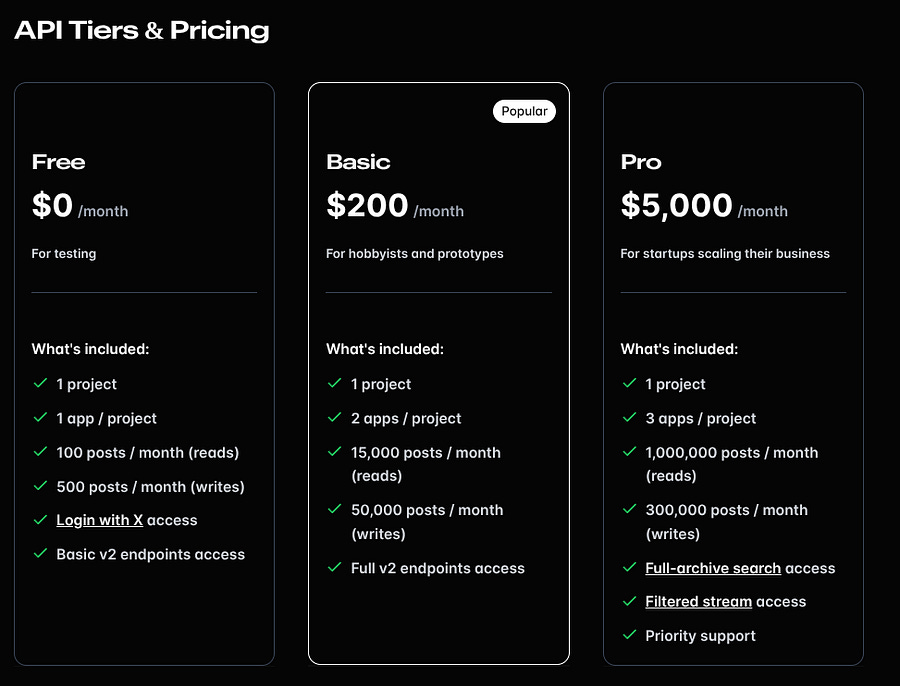
response = client.create_tweet(text=post, media_ids=[img.media_id])With the code snippets above, you’re ready to start posting from your machine, and you can do it up to 500 times per month with the free tier.
Now that you have the pillars to build your bot, a few key questions arise:
What should you post?
How do you automate the posts?
How do you create engaging content if you’re not the one writing it?
How do you grab attention with the right images or videos?
I will start by tackling the first three questions above. Then, for the fourth, I’ll show you how to use the Gemini API to make some super cool AI images with Nano Banana.
Extract the data, summarize, and automate the posts
Before creating a bot, it’s important to clarify your goals. Do you want to generate income? Drive traffic to your website? Share tech insights? Post political content? Or simply do it for fun?
For instance, I know that my parenting news bot will be difficult to drive engagement on a social network like X. But if you’re into politics, tech, or cryptocurrencies, you might get a lot of attention and therefore redirect traffic to your personal website or blog.
My X bot uses a web scraper that runs daily to extract the newest blog posts about parenting from the Today’s Parent website. You can find the web scraper on Apify:
But I also have scrapers for tech and AI news:
For cryptocurrencies, blockchain, and web3:
These are just some examples of data crawlers you can use for your bot, but you can find many more on the Apify store.
Once you have the data your bot will use, you have several options. In my case, I use an LLM to summarize a randomly selected article from my dataset and then post the summary along with the article’s link.
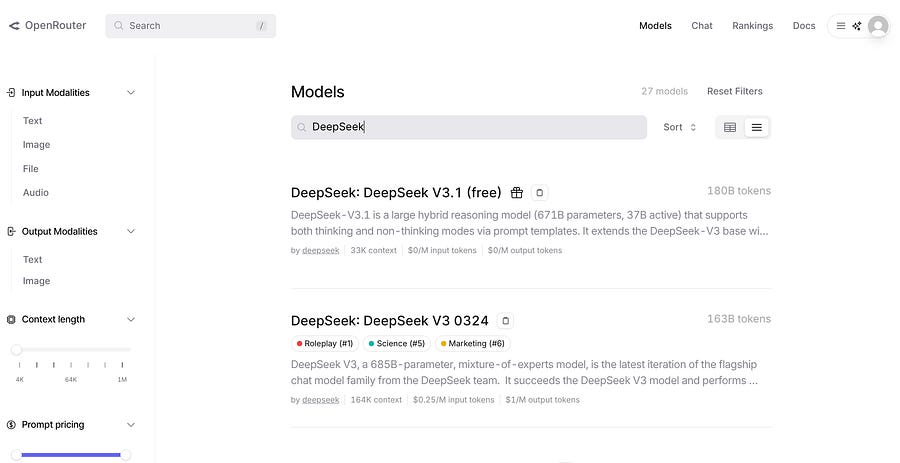
The LLM I use to create the post previews is DeepSeek V3, which you can use for free with OpenRouter.
Let me show you how to use any LLM with the OpenAI API to summarize your data or perform other tasks.
First, you need to install the OpenAI Python library:
pip install openaiAnd here’s the full Python script:
from openai import OpenAI
import pandas as pd

def create_text_for_post(row_index):
    """ Create a text for post based on daily sample row index """

    # Read the daily sample csv file
    df = pd.read_csv('daily_sample.csv')

    # Get first row author X
    author_twitter = df.iloc[row_index]['author_twitter']

    # Check if author_twitter is not NaN and is a string
    if pd.notna(author_twitter) and isinstance(author_twitter, str):
        logger.info(f"Original author_twitter: {author_twitter}")
        if ".com/" in author_twitter:
            author_twitter = "@" + author_twitter.split(".com/")[1]
            logger.info(f"Processed author_twitter: {author_twitter}")
    else:
        logger.info("author_twitter is NaN or not a string, setting to None")
        author_twitter = None

    # Get first row link
    link = df.iloc[row_index]['link']

    # Get first row title
    title = df.iloc[row_index]['title']

    # Get first row content
    content = df.iloc[row_index]['content']

    # Get first row category
    category = df.iloc[row_index]['category']

    # Get first row author display name
    author_display_name = df.iloc[row_index]['author_display_name']

    # Create and format the prompt
    template = PromptTemplate(
        input_variables=[
            "content",
            "link",
            "category",
            "title",
            "author_twitter",
            "author_display_name"],
        template=PROMPT_TEMPLATE_POST,
    )

    prompt = template.format(
        content=content,
        link=link,
        title=title,
        author_twitter=author_twitter,
        author_display_name=author_display_name,
        category=category,
    )

    client = OpenAI(
        base_url="https://openrouter.ai/api/v1",
        api_key="<your_openrouter_key",
        )

    completion = client.chat.completions.create(
        model="deepseek/deepseek-chat-v3.1:free",
        messages=[
            {
            "role": "user",
            "content": prompt
            }
        ]
    )

    response_text = completion.choices[0].message.content
    logger.info(f"Response text: {response_text}")
    return response_text
Don’t bother too much about understanding the first lines of the Python function. That’s basically my way of tackling the dataset I’ve scraped.
From the dataset’s row, I get the features that are important for the LLM’s prompt template. They are: the link, the title, the category, the content, the author’s name, and the author’s X/twitter nickname.
Here’s the prompt I use to create the text for my post, based on the inputs:
PROMPT_TEMPLATE_POST = """
    You are a specialist in parenting news about {category}. You're also
    a X-posting expert and influencer. You're tasked with writing a tweet
    about the following:

    ARTICLE TITLE: {title}
    ARTICLE AUTHOR NAME: {author_display_name}
    ARTICLE AUTHOR X/TWITTER: {author_twitter}
    ARTICLE CONTENT: {content}

    INSTRUCTIONS:
    1. Analyze the provided {content} and {title} and summarize the article
    in a post with a max length of 280 characters. Note that this is the max
    length and you need to leave some space for the {link}
    and {author_twitter} or {author_display_name}.
    So make sure that the total lenght has the summary,
    the {link} and the {author_twitter} or {author_display_name}. Keep short
    sentences and separate them with an empty line in between.
    2. If {author_twitter} is an empty string ("") or None value,
    use {author_display_name} instead to mention the author of the article.
    But always prioritize {author_twitter} first.
    3. Structure the post with emojis, but don't use a lot of them, and they
    should match the {content} or {title}.
    4. Sound like a human and mostly a parent.
    You're providing parenting information and sometimes dads and moms are
    exhausted so they need a breeze of fresh air, and some humor whenever
    the {content} or {title} allows it.
    5. You can start by mentioning {author_twitter} or {author_display_name},
    something like "@CourtneyLeiva recently wrote", but you can also start
    with the summary of the content and finalize with something
    like " - by @CourtneyLeiva".
    6. The {link} is always after the summary of the {content} and the
    {author_twitter} or {author_display_name}. And leave a an empty line
    before the {link}.
    """
The output generated with this function is sent to the previous script I’ve shared with Tweepy to publish on X.
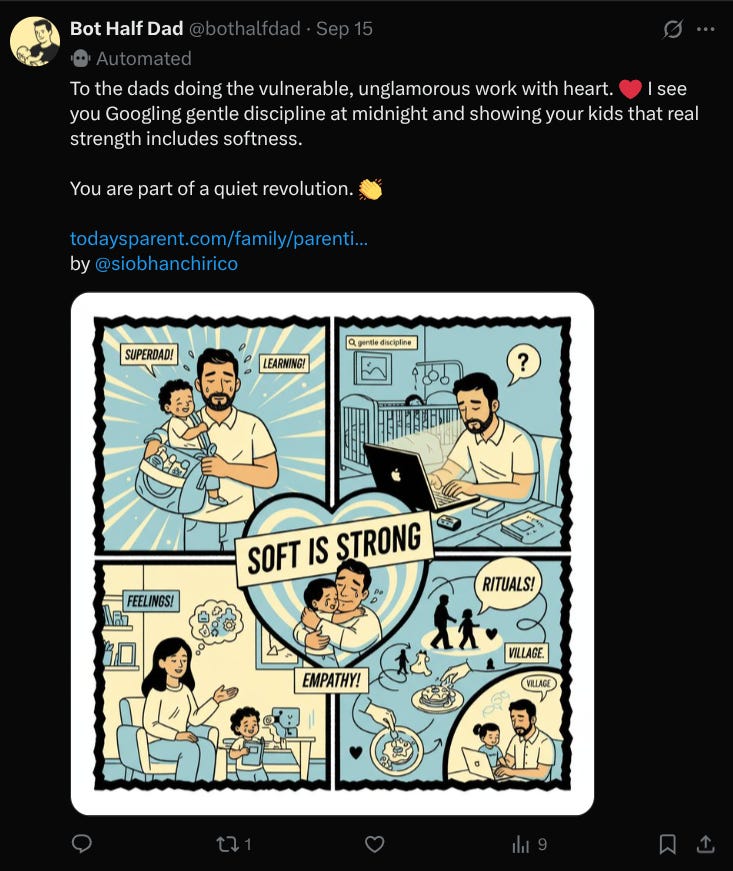
This is how the output looks on the app:
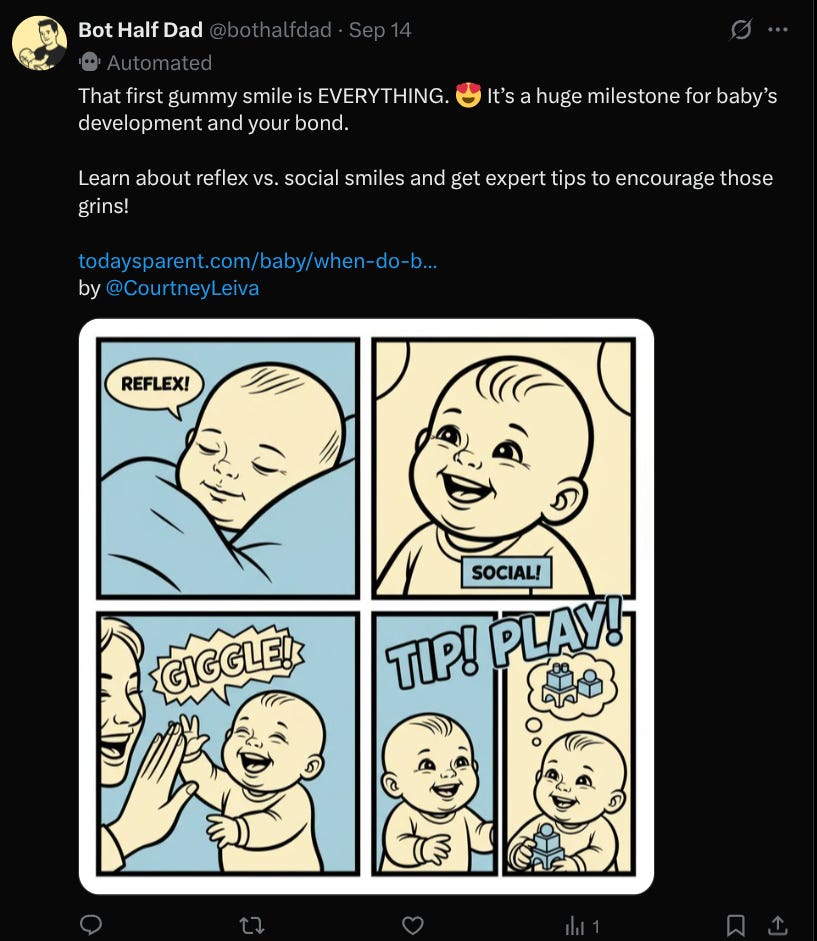
What about the image in this post? We’ll get there in the next bonus section.
If there were no image, the post would display the link’s image preview below the summary.
Tagging authors with their X nicknames can also be a smart way to catch their attention and boost engagement with your bot.
Before explaining to you how I created the cute image, you need to know how to automate the posts. Most likely, you don’t want to run it from your local machine and leave it turned on day and night.
That’s why I run the scripts on my Contabo VPS by configuring a cron job that triggers daily at a specified time.

I’m currently using the Cloud VPS 30 for only €12.5/month, which has 24 GB RAM (more than my laptop), 8 vCPU Cores, and 400 GB SSD. This plan is more than enough for most automation tasks, but feel free to have a look at the other VPS and VDS options available.

These are the cron jobs I run on my Contabo VPS to extract and publish:
# PUBLISH ON X
00 02 * * * cd ~/projects/bothalfdad && /usr/bin/python3 main.py 0
00 05 * * * cd ~/projects/bothalfdad && /usr/bin/python3 main.py 1
00 11 * * * cd ~/projects/bothalfdad && /usr/bin/python3 main.py 2
00 15 * * * cd ~/projects/bothalfdad && /usr/bin/python3 main.py 3
00 20 * * * cd ~/projects/bothalfdad && /usr/bin/python3 main.py 4

# RUN TODAYS PARENT SCRAPER
30 00 * * * cd ~/projects/todays_parent_scraper && /usr/bin/python3 src/__main__.py "Pregnancy"
35 00 * * * cd ~/projects/todays_parent_scraper && /usr/bin/python3 src/__main__.py "Kids"
45 00 * * * cd ~/projects/todays_parent_scraper && /usr/bin/python3 src/__main__.py "Baby"
55 00 * * * cd ~/projects/todays_parent_scraper && /usr/bin/python3 src/__main__.py "Family"
05 01 * * * cd ~/projects/todays_parent_scraper && /usr/bin/python3 src/__main__.py "Shopping"
I’ve decided to post 5 times per day, which is around 150 times per month, still far from the maximum of 500 posts/month with the free tier.
With all the information you have up to this point, you should be able to create your first bot on X. But what will differentiate your bot from the others?
Bonus: Create Nano Banana images for X posts with the Gemini API
In this section, I’ll show how to embed AI-generated Nano Banana images using the Gemini API.
First, you need to access Google Studio with your Google account.
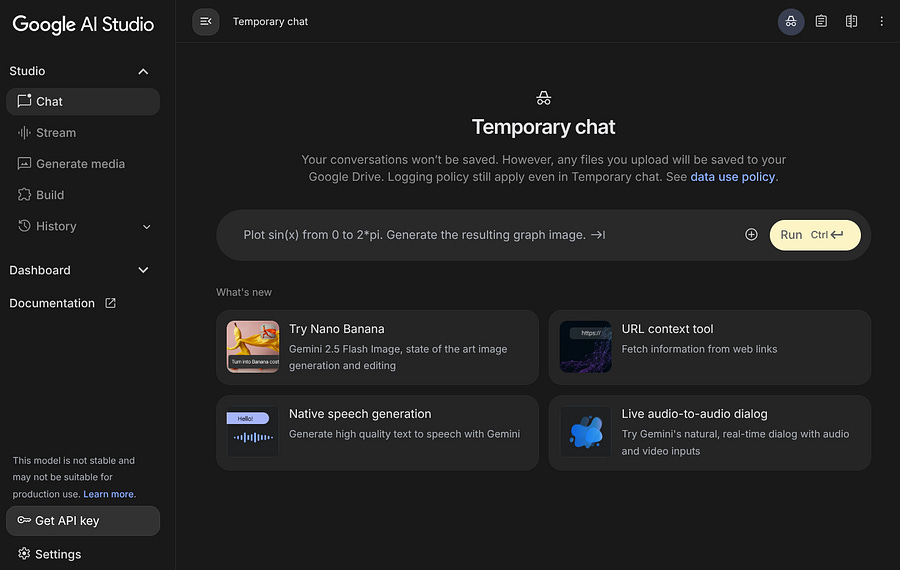
In the left corner of Google Studio, you can see the option Get API key.
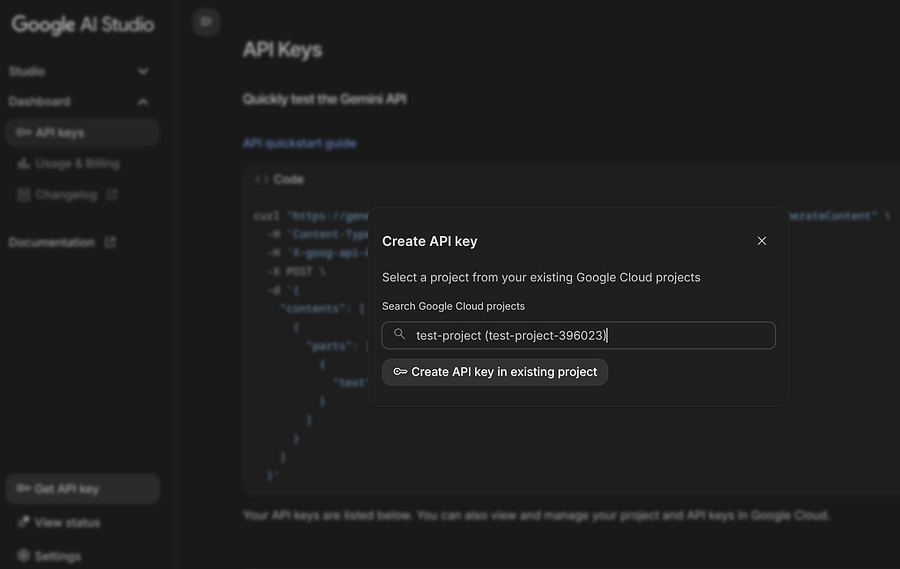
You’ll need to select a project with a billing plan, as using the API incurs a cost.
If you don’t have a project, you can follow the steps to create one on Google Cloud Platform using this insightful piece.
Also, you need to install the following Python packages:
pip install langchain-core google-genaiHere’s the function to create an image:
from langchain_core.prompts import PromptTemplate
import pandas as pd
from google import genai
from PIL import Image
from io import BytesIO

def create_image_for_post(row_index):
    """ Create an image for post based on daily sample row index """

    # Read the daily sample csv file
    df = pd.read_csv('daily_sample.csv')

    # Get first row title
    title = df.iloc[row_index]['title']

    # Get first row content
    content = df.iloc[row_index]['content']

    # Create and format the prompt
    template = PromptTemplate(
        input_variables=["content", "title"],
        template=PROMPT_TEMPLATE_IMAGE,
    )

    client = genai.Client(api_key="<google_studio_key>")

    response = client.models.generate_content(
        model="gemini-2.5-flash-image-preview",
        contents=[template.format(content=content, title=title)],
    )

    for part in response.candidates[0].content.parts:
        if part.text is not None:
            print(f"Response text: {part.text}")
        elif part.inline_data is not None:
            image = Image.open(BytesIO(part.inline_data.data))
            image.save("generated_image.png")
Just like I did to create the post text, here I do something very similar using the same row index from my dataset.
In this case, I just use the article’s content and title for the prompt template:
PROMPT_TEMPLATE_IMAGE = """
Create an illustration in a bold comic book style,
inspired by the {title} and {content} of the article.

Requirements:
1. Use only the exact colors: #bae9f9, #ffeeaa, and #252525.
   - #bae9f9 and #ffeeaa for backgrounds and highlights.
   - #252525 for outlines and shading.
2. Keep the composition clear and dynamic, like a comic panel.
3. Allow at most 2–4 words of comic-style text
(e.g., "Wow!", "Tip!", or a short caption). Avoid full sentences.
4. Make the style playful and engaging for parents.
"""
This function is placed before publishing, so I can store the image first and then embed it in the post using Tweepy as initially demonstrated in this piece.
The pricing for the Gemini 2.5 Flash Image Preview model is the following:

With a total of 25 images, I’ve spent $1.33, so it can easily become expensive if you’re planning on posting a lot of images per day.
Nonetheless, the results are impressive:
Need help with automation, AI, or data science? Let’s talk.
Conclusion
Creating a bot on X is simple, but making it stand out in a social media environment where multiple bots are running constantly is the hard part.
Fortunately, AI gives us more degrees of freedom to be creative and deliver information in the most engaging ways possible. Either it is through text, images, or video animations.
Tagging people or adding keywords that are trending on the platform is a good way to get followers, and once you get enough engagement, you can start thinking of strategies to generate income through it.
For instance, in my case, I can embed affiliate links of Montessori toys or promote family activities and baby products. In addition, I can also use it to get traffic to my personal parenting blog (I don’t have one by the way).
The options are endless, and now you have the starter kit to build yours!
If you’ve made a bot yourself, whether by following this tutorial or using other resources, feel free to drop it in the comments section. I’d love to see what you came up with!