
Easy Steps to Automate Your Posts on BlueSky with Python
Use the BlueSky Python SDK and some creativity to automate posts on BlueSky for free.

BlueSky is a social media platform created in 2019 by the founder of Twitter — Jack Dorsey. Well known for embracing decentralization, free speech, and open-source software, Jack wanted to build a social media application that covered all these. Therefore, while he was CEO of Twitter, he started building BlueSky. The platform was officially launched in February 2024, one year and a few months after Twitter’s acquisition by Elon Musk.
The blue logo and the application’s interface make BlueSky a twin brother of Twitter (currently X), with slight changes. Users who are familiar with X can easily jump in and start using it without spending time understanding how it works.
The platform has been experiencing significant growth since the U.S. elections in 2024, which is probably due to Elon Musk actively supporting the republican party. Some on the other side of the coin have decided to abandon the ship or look for alternatives.

As of January 2025, BlueSky reported having over 27 million registered users, with 55.7% being U.S. citizens.
Aside from people moving due to politics, BlueSky comes with features and tools that are certainly important to take a look at:
Custom feeds: In BlueSky, users can create custom feeds to a have more personalized experience and choose what they want to see. This also minimizes the algorithm's effort trying to predict your preferred topics.
More control: Users have more control over what they can see, mute certain words or tags, and hide unpleasant comments in their posts. These and other features that offer more power to the user are a big plus when compared to X.
Decentralization: The platform is built on the Authenticated Transfer (AT) Protocol, which enables users to host their data on servers of their choice, facilitating the creation of clients, bots, and integrations.
Free of Advertisements: On BlueSky, you don’t need to be bombarded with ads every time.
Free and simple API: As a developer, this one is my favorite. Unlike X, which requires users to pay for their API access and you need to wait for validation, BlueSky makes the process outstandingly easy. You only need your login username and password to connect to the API, currently available in Python and TypeScript.
I didn’t know much about BlueSky until recently, but I was contacted through Upwork by someone who wanted to create a bot on this platform to show daily updates about the egg prices in the United States.
I immediately accepted the job proposal and started working with the Python SDK to make automated posts with a seaborn chart showing the egg prices over time.
Before heading to the BlueSky API, the workflow starts with some web scraping. Let’s see what I’ve done to get updated information, and what tools I’ve used.
Scrape the daily egg price from reliable sources
Obtaining the data for this project can take several distinct paths. Some may be more time-consuming than others, but could provide more accuracy. For instance, we could scrape content from several supermarkets and grocery shops across all states of the U.S. and then obtain the mean value.
I took a simpler path, not because I did not like the first idea, but because the main goal was to deliver an actionable bot and not be too picky with the data accuracy.
Trading Economics is a well-known website for observing trends in commodities and stocks. The company provides an API and Python SDK, which allows you to get historical data across different markets and is worth paying for more advanced use cases. In this project, I only needed the daily price, which I could grab from the main page.
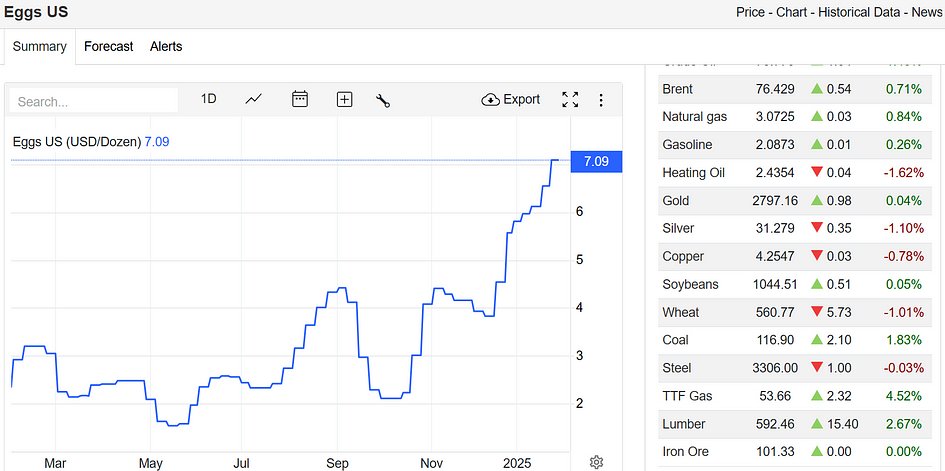
Do you see the price in blue over the chart? That’s the exact value I needed to scrape, and for that, I used Playwright headless browser with its built-in HTML parser capabilities.
First, we need to download the package using the following command line:
pip install playwrightNext, we need to install the browser using this command:
playwright installIt usually asks for some dependencies to be installed as well:
playwright install-depsNow let’s see the Python script used to get the price value:
import json
from playwright.async_api import async_playwright
from datetime import datetime
import pytz

# Add list of user agents
USER_AGENTS = [
    ("Mozilla/5.0 (Windows NT 10.0; Win64; x64) AppleWebKit/537.36 "
     "(KHTML, like Gecko) Chrome/91.0.4472.124 Safari/537.36"),
    ("Mozilla/5.0 (Macintosh; Intel Mac OS X 10_15_7) AppleWebKit/537.36 "
     "(KHTML, like Gecko) Chrome/91.0.4472.124 Safari/537.36"),]

async def run_scraper():

    # Get current US date
    us_tz = pytz.timezone('America/New_York')
    current_date = datetime.now(us_tz).strftime('%Y-%m-%d')

    async with async_playwright() as pw:
        browser = await pw.chromium.launch(
            headless=True,  # Run headless in production
            args=['--no-sandbox', '--disable-setuid-sandbox']
        )

        # Creates a new browser page with random user agent
        context = await browser.new_context(
            user_agent=USER_AGENTS[0],
            viewport={'width': 1920, 'height': 1080},
            locale='en-US'
        )
        page = await context.new_page()
        await page.goto("https://tradingeconomics.com/commodity/eggs-us")
        egg_price = await page.locator(
            '.iChart-bodylabels-ohlc').first.inner_text()
        egg_price = f"${egg_price.split(' ')[-1].strip()}"

        # Push data to JSON file
        data_entry = {
            "date": current_date,
            "egg_price": egg_price
        }

        try:
            with open('data.json', 'r', encoding='utf-8') as f:
                data = json.load(f)
        except FileNotFoundError:
            data = []

        data.append(data_entry)

        with open('data.json', 'w', encoding='utf-8') as f:
            json.dump(data, f, indent=4)

        await browser.close()
The reason why I often use USER_AGENTS is because they help avoid Cloudfare detections and other types of anti-bot blocking solutions.
Inside the run_scraper() function, the most important is the way I grabbed the value using the Playwright's page instance. First, I had to find the HTML class representing the daily price value.
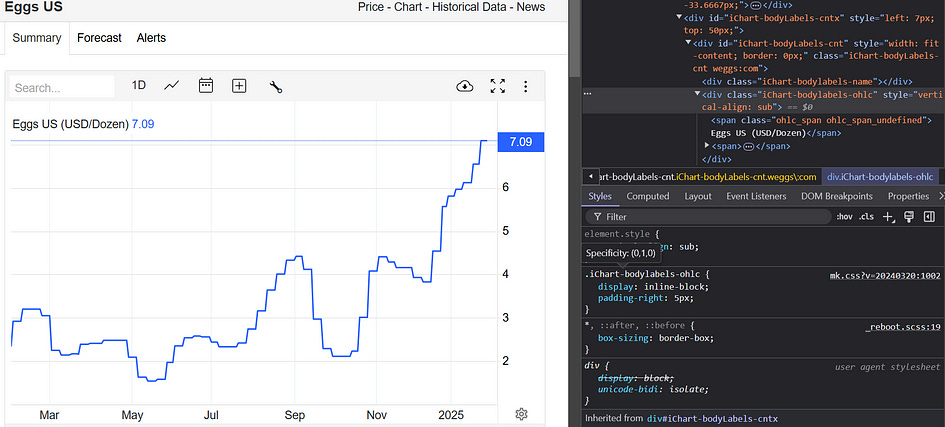
As you can see in the image above the class I needed is iChart-bodylabels-ohlc , therefore, I used the .locator() function to get that element and the .inner_text() function to get the text inside it. Finally, I cleaned the output to obtain the price value only.
Another key step in the script is the United States timezone retrieval. For that, I used the package pytz which you can also install via pip. This, paired with the datetime library provides the exact day and time in the New York timezone. The rest of the code shows how the price and the date are saved into a JSON file every time the code runs.
The scraping function is accessed from the main script that contains the BlueSky API handling. Let’s see how it was built in the next chapter.
Create the chart and main Python script
The BlueSky post is made of three main parts — the post text, an image/chart, and the hashtags. When the main script is triggered, the output looks like this:
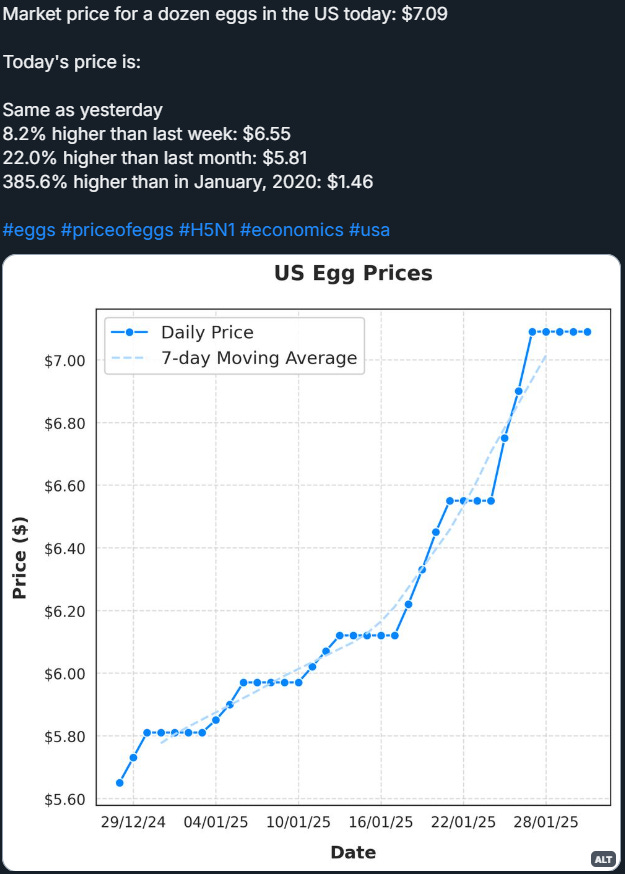
The sequence of the script is the following:
A logging function is created and launched to track and monitor the bot’s activity.
A login function,
try_login(), is called with a certain number of retries because the API doesn’t always work in the first run.The
run_scraper()function is triggered to scrape the daily value and add it to the JSON file.A chart is created and saved as PNG, using seaborn and matplotlib libraries.
Dates and price values are preprocessed with several conditions that will return variables to use in the post text.
Byte positions are created for the hashtags.
Finally, the function
try_post()is triggered, and the post is submitted to BlueSky.
Before having a better grasp of the above steps, we first need to install the BlueSky Python SDK:
pip install atprotoThe functions that use the BlueSky API are try_login() and try_post(), and they will help us understand the remaining steps.
import os
from atproto import Client
from dotenv import load_dotenv

def try_login(max_retries=3, delay=60):
    """Try to login with retries"""
    logger.info("Starting login process...")
    for attempt in range(max_retries):
        try:
            client = Client()
            client.login(os.getenv('username'), os.getenv('password'))
            logger.info(f"Successfully logged in on attempt {attempt + 1}")
            return client
        except Exception as e:
            if attempt < max_retries - 1:
                logger.warning(f"Login attempt {attempt + 1} failed: {str(e)}")
                logger.info(f"Retrying in {delay} seconds...")
                time.sleep(delay)
            else:
                logger.error(f"Failed to login after {max_retries} attempts: {str(e)}")
                raise Exception(f"Failed to login after {max_retries} attempts: {str(e)}")

def try_post(client, image_data, text, facets, max_retries=3, delay=60):
    """Try to post with retries"""
    logger.info("Starting post attempt...")
    for attempt in range(max_retries):
        try:
            post = client.send_image(
                text=text,
                facets=facets,
                image=image_data,
                image_alt="US Egg Prices",
                langs=['en']
            )
            logger.info(f"Successfully posted on attempt {attempt + 1}")
            return post
        except Exception as e:
            if attempt < max_retries - 1:
                logger.warning(f"Post attempt {attempt + 1} failed: {str(e)}")
                logger.info(f"Retrying in {delay} seconds...")
                time.sleep(delay)
            else:
                logger.error(f"Failed to post after {max_retries} attempts: {str(e)}")
                raise Exception(f"Failed to post after {max_retries} attempts: {str(e)}")
We see above that the try_login() function, not only makes the API connection with our BlueSky credentials, it also returns the client object, which is used to access other functions like .send_post() or .send_image() in this case.
The try_post() function, takes the image previously saved, the client object, text, and faucets — highlight hashtags in the post — as inputs, and submits the posts on BlueSky.
At this point, adding the image as input requires you to read it as a binary file:
# Read the image data from the file
with open('egg_prices_chart.png', 'rb') as f:
    image_data = f.read()
The complexity of the text input depends on the amount of information you wish to include. As for the faucets, which is probably the most confusing term, is a list of dictionaries that specify the positions of mentions, hashtags, and links in the text. Otherwise, they are submitted as pure strings. This list can be created in the following way:
# Find all hashtags and their positions
hashtags = ["#eggs", "#priceofeggs", "#H5N1", "#economics", "#usa"]
facets = []

# Calculate byte positions for each hashtag
for hashtag in hashtags:
    start_pos = post_text.find(hashtag)
    if start_pos != -1:
        facets.append({
            "index": {
                "byteStart": start_pos,
                "byteEnd": start_pos + len(hashtag)
            },
            "features": [{
                "$type": "app.bsky.richtext.facet#tag",
                "tag": hashtag[1:]  # Remove the # symbol
            }]
        })
Knowing these steps and functions should be enough to start posting on BlueSky from your machine, but you can perform many more actions. Just explore their insightful API documentation.
Let’s not forget one final and important note. If the goal is to create a bot it must be automated to run on a set schedule — hourly, daily, weekly, or as needed. There are multiple ways to achieve this, such as using Replit, an online IDE and deployment platform, to schedule execution. In my case, I run it on my Contabo VPS by configuring a cron job that triggers daily at a specified time.
Need help with automation, AI, or data science? Let’s talk.
Conclusion
As the number of users keep growing on BlueSky and other social media platforms are already saturated, perhaps creating an account and starting using their API could be a clever way to get engagement fast and build a strong community.
For example, if you own a website about medical devices, developing a bot to share blog posts and daily updates could drive more traffic and generate valuable leads.
You can also create AI agents that post and respond intelligently based on semantic context. The possibilities are limitless, especially in this era of RAG systems and AI agents.